Sunday, February 28, 2010
Friday, February 26, 2010
Boxee back on Apple TV
Boxee back on Apple TV: "
Filed under: Multimedia, Software, Apple TV
 Boxee recently released a brand new version of their beta software, but unfortunately, that build didn't happen to work on the Apple TV. That's now been fixed, however, and you can now get the USB flash drive creator app that will give you a patchstick to install the latest version on that Apple box hooked up to your television. Here's a quick FAQ on the whole process if you need a little help with it, but it sounds pretty straightforward: set up the patchstick, power up the AppleTV with patchstick installed, and enjoy. And even if you have alpha currently installed, you can just put the stick in and upgrade to the beta, no worries.
That's some very impressive and quick work by a bunch of people who aren't obligated to do this at all (there are a few XBMC devs on the team as well, and the patchstick will allow you to install XBMC also, if you'd like).
Filed under: Multimedia, Software, Apple TV
Boxee recently released a brand new version of their beta software, but unfortunately, that build didn't happen to work on the Apple TV. That's now been fixed, however, and you can now get the USB flash drive creator app that will give you a patchstick to install the latest version on that Apple box hooked up to your television. Here's a quick FAQ on the whole process if you need a little help with it, but it sounds pretty straightforward: set up the patchstick, power up the AppleTV with patchstick installed, and enjoy. And even if you have alpha currently installed, you can just put the stick in and upgrade to the beta, no worries.That's some very impressive and quick work by a bunch of people who aren't obligated to do this at all (there are a few XBMC devs on the team as well, and the patchstick will allow you to install XBMC also, if you'd like).
TUAWBoxee back on Apple TV originally appeared on The Unofficial Apple Weblog (TUAW) on Thu, 25 Feb 2010 17:15:00 EST. Please see our terms for use of feeds.
Read | Permalink | Email this | Comments"
Wednesday, February 24, 2010
Nintendo DSi XL launches in US on March 28th, $190
Nintendo DSi XL launches in US on March 28th, $190: "
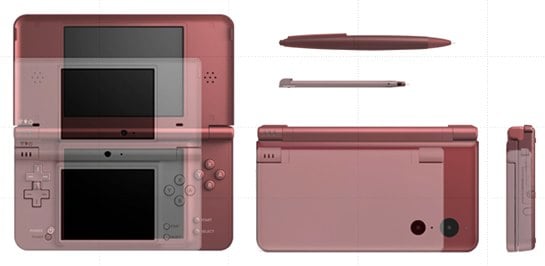
Earlier today, Nintendo announced that their new DSi XL will be launching in North America on March 28, 2007, selling for $190. The DSI XL is basically a jumbo sized Nintendo DSi, boasting two 4.2-inch LCD displays (up from the smaller DSi’s 3.25-inch displays.) At launch, the DSi XL will be available in two colors: burgundy and bronze. The new model also comes preloaded with a few games, including a couple of Brain Age DSiWare titles, Photo Clock, the DSi web browser, and Flipnote Studio. Europe gets in on the fun as well, as the XL launches bear on March 5.
Tags:
dsi xl,
handhelds,
nintendo,
nintendo dsi,
nintendo dsi xl,
portable gaming,
sidefeatured,
Nintendo DSi XL launches in US on March 28th, $190 originally appeared on Playfeed on Wed, February 24, 2010 - 2:30:02


 "
"
Earlier today, Nintendo announced that their new DSi XL will be launching in North America on March 28, 2007, selling for $190. The DSI XL is basically a jumbo sized Nintendo DSi, boasting two 4.2-inch LCD displays (up from the smaller DSi’s 3.25-inch displays.) At launch, the DSi XL will be available in two colors: burgundy and bronze. The new model also comes preloaded with a few games, including a couple of Brain Age DSiWare titles, Photo Clock, the DSi web browser, and Flipnote Studio. Europe gets in on the fun as well, as the XL launches bear on March 5.
Tags:
dsi xl,
handhelds,
nintendo,
nintendo dsi,
nintendo dsi xl,
portable gaming,
sidefeatured,
Nintendo DSi XL launches in US on March 28th, $190 originally appeared on Playfeed on Wed, February 24, 2010 - 2:30:02
Metroid: Other M coming June 27, will be hybrid 2D and 3D
Metroid: Other M coming June 27, will be hybrid 2D and 3D: "
Nintendo is holding a media summit in San Francisco today, and dropped big news about some of its largest franchises. We'll have a round-up of the announcements and our thoughts on them tomorrow, but for now... let's talk about Metroid: Other M.

Announced at last year's E3, the game will be released on June 27, and will feature hybrid 2D and 3D gameplay. "While much of the game is reminiscent of 2D side-scrollers, players can switch the perspective into 3D at any time as they explore the twisting passages of a derelict space station and delve deep into a cinematic, never-before-told story of bounty hunter Samus Aran’s past," Nintendo explains.
The Wiimote is held sideways for the 2D sections, and then used as a pointer to 'blast foes in first-person and hunt the world for clues and hidden passages.'
The game is a collaboration between Nintendo and Team Ninja, the developer behind the recent Ninja Gaiden titles, and should prove to be... interesting.
 "
"
Nintendo is holding a media summit in San Francisco today, and dropped big news about some of its largest franchises. We'll have a round-up of the announcements and our thoughts on them tomorrow, but for now... let's talk about Metroid: Other M.
Announced at last year's E3, the game will be released on June 27, and will feature hybrid 2D and 3D gameplay. "While much of the game is reminiscent of 2D side-scrollers, players can switch the perspective into 3D at any time as they explore the twisting passages of a derelict space station and delve deep into a cinematic, never-before-told story of bounty hunter Samus Aran’s past," Nintendo explains.
The Wiimote is held sideways for the 2D sections, and then used as a pointer to 'blast foes in first-person and hunt the world for clues and hidden passages.'
The game is a collaboration between Nintendo and Team Ninja, the developer behind the recent Ninja Gaiden titles, and should prove to be... interesting.
Super Mario Galaxy 2 hits 5/23: Yoshi! Drills! 2D gameplay!
Super Mario Galaxy 2 hits 5/23: Yoshi! Drills! 2D gameplay!: "
Super Mario Galaxy 2 may have started life as an extension of the original game, but the content shown at Nintendo's San Francisco media summit makes it look much more like a full sequel... hence the numbering.
Take a look at the newest trailer and see what you think.
A drill attack, Yoshi, blimp-style Yoshi, and a weird mixture of 2D and 3D gameplay? Yes please. While detractors will surely say this is just more of the same, fans will most likely buy this one by the millions. Our vote? We can't wait until May 23.
 "
"
Super Mario Galaxy 2 may have started life as an extension of the original game, but the content shown at Nintendo's San Francisco media summit makes it look much more like a full sequel... hence the numbering.
Take a look at the newest trailer and see what you think.
A drill attack, Yoshi, blimp-style Yoshi, and a weird mixture of 2D and 3D gameplay? Yes please. While detractors will surely say this is just more of the same, fans will most likely buy this one by the millions. Our vote? We can't wait until May 23.
Tuesday, February 23, 2010
If Mega Man 8-bit Deathmatch isn’t the greatest thing of all time, it’s really really close
If Mega Man 8-bit Deathmatch isn’t the greatest thing of all time, it’s really really close: "
Apparently this has been in development for quite some time, as a mod for a modern port of Doom called Skulltag. It allows you to play as any of the 48 robot masters from the first six Mega Man games. Unfortunately, while you’ll fire the weapons associated with the boss (metal blades, cut boomerangs, etc), they won’t have their respective effects on other guys — they’re all just the basic arm cannon with some modifications. That’s disappointing, but if this blows up (it’s slated for a free 2010 release) maybe we can get it expanded on.
[via TIGSource]
Streetfighter IV on the iPhone gets video, price and release date
Streetfighter IV on the iPhone gets video, price and release date: "
I myself am in the 'This will never work'-camp, but Japanese video game giant Capcom is preparing a special version of their hit title 'Streetfighter IV' for the iPhone/iPod touch. The announcement was made last week, making the iPhone version the first on a mobile device (the arcade game has been ported to the PS3 and XBox 360 only so far).
And today, Gamepro was able to lay their hands on Streetfighter IV (see their video below), revealing the final version will feature a total of eight characters: Ryu, Ken, Guile, Blanka, Chun-Li, Dhalsim, M. Bison and Abel (the console games have 17 playable characters).


 "
"
I myself am in the 'This will never work'-camp, but Japanese video game giant Capcom is preparing a special version of their hit title 'Streetfighter IV' for the iPhone/iPod touch. The announcement was made last week, making the iPhone version the first on a mobile device (the arcade game has been ported to the PS3 and XBox 360 only so far).
And today, Gamepro was able to lay their hands on Streetfighter IV (see their video below), revealing the final version will feature a total of eight characters: Ryu, Ken, Guile, Blanka, Chun-Li, Dhalsim, M. Bison and Abel (the console games have 17 playable characters).
Monday, February 22, 2010
HTC Desire: The Nexus One Clone
HTC Desire: The Nexus One Clone: "


 "
"
HTC Desire: The Nexus One Clone - HTC has introduced a new smartphone that is almost the same as the Google Nexus One in terms of design and hardware features. The HTC Desire has a lot to be liked about since it has all the qualities of a really powerful and good-looking smartphone.
Like the Nexus One, the HTC Desire has a 3.7-inch AMOLED capacitive touchscreen display (800x480 resolution), Qualcomm 1GHz Snapdragon processor, and 5-Megapixel auto-focus camera with LED flash among others. It is also running on Android version 2.1 (Eclair).
Like the Nexus One, the HTC Desire has a 3.7-inch AMOLED capacitive touchscreen display (800x480 resolution), Qualcomm 1GHz Snapdragon processor, and 5-Megapixel auto-focus camera with LED flash among others. It is also running on Android version 2.1 (Eclair).

While the size and shape of HTC Desire is similar to that of Nexus One, it has a few useful changes like the additional buttons at the bottom and the trackball has been replaced with an optical version.
On the software side of things, the HTC Desire added the Sense UI Android overlay that gives it a lot of enhancements in user interface and functionality. HTC has also created something useful, which they are calling as the Helicopter Mode. --It allows users to simply pinch in on the home screen and see all the seven widget-filled windows at once, which is really handy.
A short video introduction of HTC Desire:
A short video introduction of HTC Desire:
HTC Desire is expected to be released around 2nd quarter of 2010. I'm sure this phone will make a lot of us think twice before buying a Nexus One.
Friday, February 19, 2010
How to Open/Extract UIF Files in Ubuntu Linux
How to Open/Extract UIF Files in Ubuntu Linux: "
 How to Open/Extract UIF Files in Ubuntu Linux: If you have downloaded a UIF (.uif) file and is wondering what it is or don't know how to open it when using Ubuntu Linux or any other distro, then read on.
So what is UIF? UIF (Universal Image Format) is a compression image file format used by MagicISO that is primarily utilized to compress and backup a CD and DVD content. The advantage of using UIF file format is that it allows you to encrypt, password protect and compress cd or dvd content along with the ability to backup multiple session of CD/DVD, Audio-CD, VCD, SVCD and DVD-Video.
Now let's get down to business and show you how to open a .uif file in Ubuntu:
1. First you will need to download a command-line tool for converting UIF images:
sudo apt-get install uif2iso
2. Next, locate the file that you wish to convert and simply use this command:
uif2iso [input.uif] [output.iso]
 Converting a file named movies.uif to movies.iso


 "
"
 How to Open/Extract UIF Files in Ubuntu Linux: If you have downloaded a UIF (.uif) file and is wondering what it is or don't know how to open it when using Ubuntu Linux or any other distro, then read on.
So what is UIF? UIF (Universal Image Format) is a compression image file format used by MagicISO that is primarily utilized to compress and backup a CD and DVD content. The advantage of using UIF file format is that it allows you to encrypt, password protect and compress cd or dvd content along with the ability to backup multiple session of CD/DVD, Audio-CD, VCD, SVCD and DVD-Video.
Now let's get down to business and show you how to open a .uif file in Ubuntu:
1. First you will need to download a command-line tool for converting UIF images:
sudo apt-get install uif2iso
2. Next, locate the file that you wish to convert and simply use this command:
uif2iso [input.uif] [output.iso]
 Converting a file named movies.uif to movies.iso
3. So after converting the UIF file to ISO, simply locate the output file (in my case movies.iso) using the file browser, right-click on it, and then extract.
That's about it. It’s pretty easy, right?
That's about it. It’s pretty easy, right?
Thursday, February 18, 2010
Back Up a Complete Vista PC Across a Network Using wbadmin
Back Up a Complete Vista PC Across a Network Using wbadmin: "
Compared to the backup tools that come with previous versions of Windows, Vista’s Backup and Restore Center, is a delight – except for one small problem: It can’t do a complete system (image) backup to another computer on the network. In this article we learn a workaround to this limitation.
Backup and Restore Center
The Windows Vista Backup and Restore Center introduced to Windows users the ability to backup your entire computer: files, programs, settings, registry – everything.

Running The program created a VHD file – an image of your entire C drive. In the event of a theft or hard disk failure, your system could be restored to the exact state it was in when the last backup was taken (using the Windows Recovery Environment on your Windows installation DVD).
This VHD image file would typically be enormous (the combined size of all files on your C drive), and so a location to store this file would need to be chosen carefully. Unfortunately, the only options presented to you were other hard disks in your system (such as an internal D drive or an external USB drive) or a collection of blank DVDs.

An obvious omission was the ability to back up across a Local Area Network, to another computer such as to a file server or backup server. Only Microsoft would be able to tell us why this option was omitted. Thankfully it has been added into Windows 7.
If your backup regime requires that your Windows Vista system be backed up across a network, and you’re not willing to shell out for third-party software, such as Norton Ghost or Acronis True Image, then you’ll need to use the little-known Windows system backup utility called wbadmin. wbadmin is a command-line tool, and so to use it you will probably choose one of the following methods:
Given that most people who need to back up a system won’t want to do it just once, and will more than likely have a need to do it on a regular (daily or weekly) basis, this tutorial will explore the third option:
Automating a regular full system backup using the Windows Task Scheduler
To schedule a regular backup, we must first open the Windows Task Scheduler. This is easily located by clicking the Start button and typing “task“:

The Task Scheduler window then opens. To schedule a backup, click on Create Basic Task…

The Create Basic Task Wizard starts and prompts us for a name by which we would like to refer to this task. We can give it a name such as “Weekly Full System Backup”:

We then click the Next button and are prompted for how frequently we would like to like to run the backup. Obviously the choice made at this point is up to you (or your IT department), but for this tutorial we will choose Weekly:

We click the Next button and are prompted to complete the scheduling details. We will choose Every Wednesday morning at 4:30am:

We click the Next button and are prompted for what type of task we want to perform. We will choose Start a program:

We click the Next button and are prompted for the name of the program we wish to run, as well as any command-line arguments (parameters) we will to provide to the program.
We could browse for the program, but in this case it’s easier to simply type its name: wbadmin..
The command-line arguments we will specify in this example are:
These options mean the following:
There are many other options for the wbadmin program. These are all detailed on Microsoft’s TechNet page (link below).
It is not necessary to specify anything in the Start in box:

That is all the information that the wizard requires. We click the Next button to see a summary of the task details:

…and then click the Finish button to return to the list of active tasks:

It may be necessary to double-click on the newly created task to adjust some of the properties or conditions, specifically:
The task will now run every Wednesday morning. You can also run it manually whenever you want by opening the Windows Task Scheduler, locating the task in the list and clicking the Run button in the Actions pane to the right.
Once the task has completed, you can navigate to the network computer/folder that you specified in the task settings and see the results. You will see a folder called WindowsImageBackup, and within that a sub-folder with the same name as the computer you were backing up. If you back up several machines with this technique, you will see one sub-folder for each computer. Within each sub-folder you will see a subfolder called Backup with a date in its name. That is where your image files are located, along with some XML housekeeping files. The backup files are easy to identify, as they are many Gigabytes in size and have a VHD extension.

Notes:


 "
"
Compared to the backup tools that come with previous versions of Windows, Vista’s Backup and Restore Center, is a delight – except for one small problem: It can’t do a complete system (image) backup to another computer on the network. In this article we learn a workaround to this limitation.
Backup and Restore Center
The Windows Vista Backup and Restore Center introduced to Windows users the ability to backup your entire computer: files, programs, settings, registry – everything.
Running The program created a VHD file – an image of your entire C drive. In the event of a theft or hard disk failure, your system could be restored to the exact state it was in when the last backup was taken (using the Windows Recovery Environment on your Windows installation DVD).
This VHD image file would typically be enormous (the combined size of all files on your C drive), and so a location to store this file would need to be chosen carefully. Unfortunately, the only options presented to you were other hard disks in your system (such as an internal D drive or an external USB drive) or a collection of blank DVDs.
An obvious omission was the ability to back up across a Local Area Network, to another computer such as to a file server or backup server. Only Microsoft would be able to tell us why this option was omitted. Thankfully it has been added into Windows 7.
If your backup regime requires that your Windows Vista system be backed up across a network, and you’re not willing to shell out for third-party software, such as Norton Ghost or Acronis True Image, then you’ll need to use the little-known Windows system backup utility called wbadmin. wbadmin is a command-line tool, and so to use it you will probably choose one of the following methods:
- The Windows command prompt,
- Writing a batch file (script), or
- Automating the backup using the Windows Task Scheduler
Given that most people who need to back up a system won’t want to do it just once, and will more than likely have a need to do it on a regular (daily or weekly) basis, this tutorial will explore the third option:
Automating a regular full system backup using the Windows Task Scheduler
To schedule a regular backup, we must first open the Windows Task Scheduler. This is easily located by clicking the Start button and typing “task“:
The Task Scheduler window then opens. To schedule a backup, click on Create Basic Task…
The Create Basic Task Wizard starts and prompts us for a name by which we would like to refer to this task. We can give it a name such as “Weekly Full System Backup”:
We then click the Next button and are prompted for how frequently we would like to like to run the backup. Obviously the choice made at this point is up to you (or your IT department), but for this tutorial we will choose Weekly:
We click the Next button and are prompted to complete the scheduling details. We will choose Every Wednesday morning at 4:30am:
We click the Next button and are prompted for what type of task we want to perform. We will choose Start a program:
We click the Next button and are prompted for the name of the program we wish to run, as well as any command-line arguments (parameters) we will to provide to the program.
We could browse for the program, but in this case it’s easier to simply type its name: wbadmin..
The command-line arguments we will specify in this example are:
start backup -backuptarget:\\servername\sharename -include:c:
-user:MYNAME -password:MYPASSWORD -quiet
These options mean the following:
- start start the job (not now, but when the task is scheduled, of course)
- backup the job to start is a backup
- -backuptarget:\\servername\sharename The location to back up to. This could be a simple Drive:Folder path (e.g. D:/Backups), or – in this case – the UNC path of a computer and network shared folder.
- -include:c: The drives to include in the backup. If you want multiple drives, separate them with commas (no spaces). i.e. -include c:,d:
- -user:MYNAME -password:MYPASSWORD The username and password required to access the remote target computer/folder on the network. (obviously, you replace MYNAME with your actual username and MYPASSWORD with your actual password.)
- -quiet Run the job without prompting the user for any information
There are many other options for the wbadmin program. These are all detailed on Microsoft’s TechNet page (link below).
It is not necessary to specify anything in the Start in box:
That is all the information that the wizard requires. We click the Next button to see a summary of the task details:
…and then click the Finish button to return to the list of active tasks:
It may be necessary to double-click on the newly created task to adjust some of the properties or conditions, specifically:
- On the General tab, you may wish to ensure that the task runs even if you are not logged in. If you do this, you will be prompted to supply the login credentials – username and password – of the user that the task is to be run as.
- On the Conditions tab (if your computer is a laptop), you may wish to elect to only run the backup task if the computer is plugged into mains power.
The task will now run every Wednesday morning. You can also run it manually whenever you want by opening the Windows Task Scheduler, locating the task in the list and clicking the Run button in the Actions pane to the right.
Once the task has completed, you can navigate to the network computer/folder that you specified in the task settings and see the results. You will see a folder called WindowsImageBackup, and within that a sub-folder with the same name as the computer you were backing up. If you back up several machines with this technique, you will see one sub-folder for each computer. Within each sub-folder you will see a subfolder called Backup with a date in its name. That is where your image files are located, along with some XML housekeeping files. The backup files are easy to identify, as they are many Gigabytes in size and have a VHD extension.
Notes:
- More information about the wbadmin program can be found on either Microsoft’s TechNet page or on the Wikipedia page.
- VHD files can be mounted and browsed (to restore individual files without having to restore the entire drive) by using the small and useful VHD Attach utility.
- When the task is run the following week, the previous backups will be automatically removed. Only one set of VHD files will be present in the WindowsImageBackup folder for each computer at any given time.
| Similar Articles | Productive Geek Tips |
| Latest Software Reviews | Tinyhacker Random Tips |
Subscribe to:
Posts (Atom)


