Thursday, September 30, 2010

Crack the Ends and Blow to Easily Peel Hard-Boiled Eggs [Video]

Crack the Ends and Blow to Easily Peel Hard-Boiled Eggs

Crack the Ends and Blow to Easily Peel Hard-Boiled Eggs Hard-boiled eggs are a great, protein-packed snack, but getting them out of their shells can be messy and cumbersome. Not so much if you use the method Tim Ferriss demonstrates in this video.

There are three aspects to the easier egg peel. One is to add baking soda to the water you're boiling the eggs with, which, incidentally, should leave two inches of water over the tops of the eggs. Then, as usual, you quickly cool down the eggs after about 12 minutes of slow boiling, using ice and cold water. Finally, you take the steps Ferriss demonstrates in the video: tap and remove a little shell on each end, then blow through one end to extract the egg through the shell.

No remnants, no cracked egg whites, and you could move through a batch of hard-boiled eggs at a faster clip. (Note: We'd previously posted a similar method, but noticed that video had been taken down, so we found a new source with a good explanation).

Send an email to Kevin Purdy, the author of this post, at kevin@lifehacker.com.


track');

Your version of Internet Explorer is not supported. Please upgrade to the most recent version in order to view comments.

   
Loading comments ... -/|\\\\\" /></div> 	</div>  	<div class=


In order to view comments on lifehacker.com you need to enable JavaScript.
If you are using Firefox and NoScript addon, please mark lifehacker.com as trusted.


Posted via email from ://allthings-bare

Wednesday, September 29, 2010

The easiest way to set up Samba for file-sharing | Linux and Open Source

Samba, Apache, and MySQL are probably the biggest open source projects found on Linux (aside from the Linux kernel itself, of course). All three have really elevated Linux for use in home networks and corporate environments.

With them, anyone can have a file and print server, a Web server, or a database. All three come with pretty much every Linux distribution you can find.

The most ubiquitous of the three is probably Samba, because it and the functionality it provides is found in every operating system. Linux, OS X, the BSDs and others use Samba. It is directly compatible with Windows because it uses the Windows file and print sharing protocols to allow for sharing Windows file systems on Linux and vice versa.

Samba allows for a lot of configuration, and there are many options to use — primarily relating to authentication. When Samba 4 finally lands, it will be an incredible release with Active Directory support and being able to act as an Active Directory server, with internal LDAP and Kerberos servers to fully flesh out what is necessary for full integration with Windows networks. Until then, you can still hack Samba up to do a lot of these things, and it works fantastic as a client in Windows networks. You can make Samba work with Active Directory, with LDAP, and with local passwords.

Most people will just want a stand-alone Samba server somewhere on their network and that is the easiest to set up. To begin with, you need Samba installed on your system. This can be done by installing the “samba” or “samba3″ (on some distributions) package, either using yum or apt-get or whatever mechanism your distribution uses to install packages. Once Samba is installed, edit the /etc/samba/smb.conf file. If you’re using Red Hat Enterprise Linux or Fedora, you will need to make further changes if you have SELinux support enabled; the comments in smb.conf will help with the additional steps.

A very basic smb.conf file will look like this:

 [global]
    workgroup = MYGROUP
    server string = Samba Server Version %v
    log file = /var/log/samba/log.%m
    max log size = 50
    security = user
    passdb = tdbsam
[homes]
    comment = Home Directories
    browseable =no
    writable = yes

This is an absolutely basic configuration file. If you already have a workgroup defined, change the “workgroup” value to whatever you have already defined for the network. The rest can remain as-is. This will allow you the ability to connect to the server and mount your home directory on the server from any other machine on the network.

The next step is to create the local passwords. Because Samba does not use the authentication credentials of the system (i.e., via PAM), you need to add the user to the Samba user database:

# smbpasswd -a user

Provide the password for the user in question. Also note that this user must also exist on the system, so if this is a new user you must use useradd to create the user and passwd to set their password. If the user already exists on the server, there is no need to do anything more than set their Samba password.

Once this is all complete, start the Samba server (or restart it):

# service smb start

Now, from another system, you can use smbclient to list available shares:

% smbclient -L \\server.myhost.com
Password:
Domain=[CERBERUS] OS=[Unix] Server=[Samba 3.5.4-62.fc13]
       Sharename       Type      Comment
       ---------       ----      -------
       IPC$            IPC       IPC Service (Samba Server Version 3.5.4-62.fc13)
       user            Disk      Home Directories
Domain=[CERBERUS] OS=[Unix] Server=[Samba 3.5.4-62.fc13]
       Server               Comment
       ---------            -------
       Workgroup            Master
       ---------            -------

To mount the share, connect to \\server.myhost.com\user using the network browser in GNOME, the Finder in OS X, or Windows Explorer in Windows.

This is the easiest way to set up Samba for file sharing. Other mechanisms exist for sharing files on a LAN, such as NFS or SSHFS, but Samba is quick, easy to set up, and reliable. It is also cross-platform, making it easy to share files amongst various operating systems.

Get the PDF version of this tip here.

Posted via email from ://allthings-bare

Skype and Facebook teaming up on SMS, voice and video chat

Filed under: VoIP, Social Software

Skype and Facebook teaming up on SMS, voice and video chat

by Lee Mathews (RSS feed) Sep 29th 2010 at 8:20AM


If you're the biggest social network around and you need to tap someone for video chat, who better to do it than the biggest name in video calling? That's what Facebook thinks, and they're teaming up with Skype to deliver SMS and voice/video chat using Facebook Connect.

As Kara Swisher reports, Facebook hopes that giving users stronger communication tools will lead to a tighter community -- more users using it more often. Skype will likely see a nice increase in its monthly usage as well. While 124 million people Skyping at least once a month is certainly impressive, Facebook integration will no doubt provide a big boost.

Skype 5, which is set to release in a few weeks, will add a Facebook tab from where you'll be able to SMS or call your FB friends. The new version is currently in beta testing right now, but Facebook integration has yet to appear.

Posted via email from ://allthings-bare

What Files Should You Backup On Your Windows PC?

Everybody always tells you to make sure that you are backing up your PC, but what does that really mean? And what files do you actually need to backup? Today we’ll walk you through the basics of backing up your PC, what you should back up, and why.

Of course, these rules won’t fit every scenario, so you’ll need to use a little common sense—think about what is most important to you on your PC, and make sure that you’ve figured out how to backup those files.

Photo by Son of Groucho

The All-Important Rule of Backups

imageThe primary principle of backing up your data is that any important data should exist in two or more physical locations at once. You cannot create a backup and delete the original, or else it is no longer really a backup.

You might think this is obvious, but you’d be surprised how often I’ve been approached by readers that lost their data after their “backup” drive died.

What Should You Use for Backing Up Your PC?

image

There are lots of different applications that you can use to make backups of your files, and there’s even one built into Windows… It doesn’t matter which tool you use as long as it does a decent job of creating backups.

Local Backups
It’s important to create local backups to an external drive or another PC for speed of restoring files should something bad happen, and also because this is going to be the quickest way to create backups.

We’ve also got guides to show you how to use Backup and Restore in Windows, GFI Backup, Macrium Reflect, and even Simple Backup in Linux—but the tool isn’t that important—what you are backing up is.

Online Backups
There are a number of paid online backup services like Mozy, Carbonite, Spideroak, and Jungledisk, and there are also some file sync services like Dropbox and SugarSync that provide backup type of capability. These are all excellent secondary backup services, but probably shouldn’t replace a regular backup just because they will take a long time to restore.

Note: if you’re looking for a great way to keep a folder in sync between PCs and accessible from anywhere, Dropbox rocks. We love it. Otherwise, you should probably check out Mozy, since it has a unique ability to create local backups as well as online backups.

System Image Backups
Rather than simply backing up files, you can create a complete backup of your system that can be restored over top of your system. The only problem with creating these type of backups is that they require a real lot of drive space. The best bet is to create an image when your system is up and running and everything is installed, and then you can use it to more easily restore everything rather than reinstalling everything manually.

We’ve got guides to help you create a system image using the built-in tools in Windows 7 or Vista, how to restore from that system image, how to make a drive image using an Ubuntu Live CD, or even how to do it with a freeware application called DriveImageXML. If you’re looking for a paid solution that works really well, you can check out Acronis.

What Files Should You Backup?

image

The most important files to backup are probably your documents, pictures, music, and other user files, but they are not the only files that you need to backup. Let’s walk through some of them.

  • Documents: You should backup your entire documents folder all the time. This should be a no-brainer.
  • Music: If you’ve paid lots of money for MP3 downloads, you’ll probably be sad to lose them. Make sure to include this folder. Note: if you’re an iTunes user, you should make sure to backup your iTunes folder, which is thankfully usually inside this directory.
  • Pictures & Videos: It’s really sad when I get emails from people saying their hard drive died and they lost all their pictures of their family. The photos might not have actually costed you anything, but you’ll probably be more sad about losing memories than paying for music downloads again.
  • Desktop Email: If you’re using Outlook or Windows Live Mail, make absolutely certain that you’ve backed up the files from these applications. Outlook stores all your email in a .PST file, and here’s how to find it.
  • Application Settings: If you look within the AppData folders, you’ll see directories for each and every application you’re running. These settings can often be restored from a backup so you don’t have to tweak everything again. Just head into C:\Users\Username\AppData\ to see the Local, Roaming, and LocalLow folders that contain many settings for your applications.
    image
  • Virtual Machines: If you use virtual machines for real work, you should probably create a backup of your virtual machines at some point. We wouldn’t necessarily recommend backing these up every single night, but you should at least consider some type of backup plan.
  • Bookmarks: Most browsers other than Internet Explorer actually make it difficult to backup your bookmarks using Windows Backup, but the much better option is to sync your bookmarks to the cloud. Naturally, we’ve got a full list of all the bookmark syncing services that you can use. If you’d rather use local backup, you can simply backup the application settings folder and restore that—this works especially well for Firefox in our experience.

Backup These Files More Easily 
Instead of trying to find all those locations, backup your entire Users folder, which is at C:\Users\Username in Windows 7 or Vista, and C:\Documents and Settings\Username for Windows XP. This will include all of those files, unless you’ve stored them somewhere else.

Files You Should Not Bother Backing Up

sshot-2010-09-29-1-00-47-00

There’s simply no reason to backup these directories:

  • Windows: There’s almost never a reason to backup your Windows directory, as you’re going to have to reinstall the whole thing anyway, so this backup will likely do you no good.
  • Program Files: You’re going to have to reinstall your applications if your computer dies and you have to reinstall. Why bother backing up all these files?

It’s worth noting that if you create a system image backup, you won’t have to reinstall all of your applications, and backing up these folders would still be pointless.

When should you backup?

The best bet is to backup your files on a fairly regular basis–daily if possible. If you’re using an online backup solution, they are often configured to immediately start syncing any changed files when your PC is idle for a little while. This can be a great way to keep your files safe without having to wait for the next backup.

Hopefully these tips will help you backup your files and keep you protected. Be sure to check out our checklist guide for reinstalling Windows in the unfortunate event that you do need to start over from scratch.

Don’t forget the most important rule: any important data should exist in two or more physical locations at once.

Posted via email from ://allthings-bare

10 Ways to Generate a Random Password from the Command Line

image

One of the great things about Linux is that you can do the same thing hundreds of different ways—even something as simple as generating a random password can be accomplished with dozens of different commands. Here’s 10 ways you can do it.

We gathered all of these commands from Command-Line Fu and tested them out on our own Linux PC to make sure they work. You should be able to use at least some of these on Windows with Cygwin installed, though we didn’t test all of them—the last one definitely works though.

Generate a Random Password

For any of these random password commands, you can either modify them to output a different password length, or you can just use the first x characters of the generated password if you don’t want such a long password. Hopefully you’re using a password manager like LastPass anyway so you don’t need to memorize them.

This method uses SHA to hash the date, runs through base64, and then outputs the top 32 characters.

date +%s | sha256sum | base64 | head -c 32 ; echo

This method used the built-in /dev/urandom feature, and filters out only characters that you would normally use in a password. Then it outputs the top 32.

< /dev/urandom tr -dc _A-Z-a-z-0-9 | head -c${1:-32};echo;

This one uses openssl’s rand function, which may not be installed on your system. Good thing there’s lots of other examples, right?

openssl rand -base64 32

This one works a lot like the other urandom one, but just does the work in reverse. Bash is very powerful!

tr -cd '[:alnum:]' < /dev/urandom | fold -w30 | head -n1

Here’s another example that filters using the strings command, which outputs printable strings from a file, which in this case is the urandom feature.

strings /dev/urandom | grep -o '[[:alnum:]]' | head -n 30 | tr -d '\n'; echo

Here’s an even simpler version of the urandom one.

< /dev/urandom tr -dc _A-Z-a-z-0-9 | head -c6

This one manages to use the very useful dd command.

dd if=/dev/urandom bs=1 count=32 2>/dev/null | base64 -w 0 | rev | cut -b 2- | rev

You can even create a random left-hand password, which would let you type your password with one hand.

</dev/urandom tr -dc '12345!@#$%qwertQWERTasdfgASDFGzxcvbZXCVB' | head -c8; echo ""

If you’re going to be using this all the time, it’s probably a better idea to put it into a function. In this case, once you run the command once, you’ll be able to use randpw anytime you want to generate a random password. You’d probably want to put this into your ~/.bashrc file.

randpw(){ < /dev/urandom tr -dc _A-Z-a-z-0-9 | head -c${1:-16};echo;}

You can use this same syntax to make any of these into a function—just replace everything inside the { }

And here’s the easiest way to make a password from the command line, which works in Linux, Windows with Cygwin, and probably Mac OS X. I’m sure that some people will complain that it’s not as random as some of the other options, but honestly, it’s random enough if you’re going to be using the whole thing.

date | md5sum

Yeah, that’s even easy enough to remember.

There’s loads of other ways that you can create a random password from the command line in Linux—for instance, the mkpasswd command, which can actually assign the password to a Linux user account. So what’s your favorite way?

Posted via email from ://allthings-bare

Nintendo 3DS: First Titles, Final Design, And More Details Revealed

As we just posted, Nintendo revealed at its 3DS press conference in Tokyo today (which is now over) that the new system will hit stores in Japan on February 26 (price: $300, including a 2GB SD card), followed by the US and Europe one month later (price yet unknown). But that wasn’t all, as big N also showed the final design of the hardware, listed up quite a few cool game titles and made some other interesting announcements.

And if what Nintendo revealed today at the press conference is any indication, the 3DS looks like another home run for the company – although it’s pricey. But what did they say?

1) Virtual console
The 3DS will feature a Virtual Console that will allow you to download Game Boy, Game Boy Color, and Game Boy Advance games. Super Mario Land and Link’s Awakening were the two titles demo’d.

2) Wireless capability
Tag mode: 3DS systems will be able to exchange data with each other, transferring data for multiple games at once (you don’t have to be playing the game at the time to receive data). In tag mode, the 3DS auto-exchanges information like last game played, when you met the other player, etc.

With Wi-Fi turned on, the 3DS can auto-download various data (rankings, entire games etc.) at hot spots even in sleep mode.

3) Final Hardware design
Not many surprises here, it’s just the stylus that looks sexier than before, and the slidepad is now in a different color. The first two colors are blue and black, but others are sure to follow soon.

You’ll be able to tweak the depth of the 3D effect for games and content through a 3D slider on the right side, as pictured below (that feature was already known and is likely to be taken over by competitors in the future):

4) Mii Studio
Make a picture of a person with the camera, and it will be automatically turned into a Mii. Mii pictures can then be saved on SD cards. It’s also possible to exchange Miis with people who you meet out on the street (in tag mode).

5) Other bits and pieces

  • The 3DS comes with a function that merges two pictures into one, for example to create one face out of two.
  • Japanese TV stations are preparing 3D content specifically for the 3DS.
  • Nintendo seems to be ready to stress web browsing capabilities stronger with the 3DS and has demo’d a web browser.
  • Nintendo didn’t announce this before but plans to use the cameras in the 3DS for augmented reality games.

6) List of top games currently in development (hit this link for a video – sorry, wasn’t able to embed it here)

  • Resident Evil: Revelation
  • Resident Evil: Mercenaries
  • Mega Man Legends 3
  • Super Street Fighter 4 – 3D
  • Dead or Alive
  • Super Monkeyball
  • Ridge Racer
  • Metal Gear Solid Snake Eater
  • StarFox64 3D
  • Steel Diver
  • Paper Mario
  • nintendogs + cats
  • Mario Kart
  • Pilot Wings Resort
  • Paper Mario
  • The Legend of Zelda: Ocarina of Time

Posted via email from ://allthings-bare

Tuesday, September 28, 2010

How to Crack Your Forgotten Windows Password

image

Here at How-To Geek, we’ve covered many different ways to reset your password for Windows—but what if you can’t reset your password? Or what if you’re using drive encryption that would wipe out your files if you changed the password? It’s time to crack the password instead.

To accomplish this, we’ll use a tool called Ophcrack that can crack your password so you can login without having to change it.

Download Ophcrack

The first thing we will need to do is download the CD image from Ophcrack’s website. There are two options to download, XP or Vista, so make sure you grab the right one. The Vista download works with Windows Vista or Windows 7, and the only difference between XP and Vista is the “tables” Ophcrack uses to determine the password.

Once the .iso file is downloaded, burn it to a CD using the guide below.

If you are going to be cracking your password on something that doesn’t have a CD drive, such as a netbook, download the universal USB creator from PenDrive Linux (Link Below). A USB drive will not only run faster but you can also use a single USB drive for Windows XP, Vista, and 7 if you copy the needed tables to the drive.

To create a USB drive that works with all versions of Windows, download the free password tables from Ophcrack’s website.

Note: There are free tables available on Ophcrack’s website and there are paid tables, the paid tables will typically get the job done faster and will be able to crack more complex passwords but the paid tables may not fit on a USB drive because they range in size from 3 GB to 135 GB.

Now extract the tables to \tables\vista_free on the USB drive and they will be used automatically by Ophcrack.

Boot from CD/USB

Boot the computer from the CD or USB drive that you created.

Note: On some computers you may have to go into the BIOS settings to change the boot order or push a key to show the boot menu.

image

Once the disk is done booting, Ophcrack should start automatically and will begin cracking the passwords for all of the users on your computer.

Note: If the computer boots and you only have a blank screen or Ophcrack doesn’t start, try restarting the computer and selecting manual or low RAM options on the live CD boot menu.

If you have a complex password it will take a lot longer than simple passwords, and with the free tables your password may never be cracked. Once the crack is done you will see the password in plain text, write it down and reboot the machine to login. If your password isn’t cracked, you can also log in as one of the other users with admin rights and then change your password from within Windows.

With the free tables available you will not be able to crack every password, but the paid tables range from $100 to $1000 so you may be better off just resetting your password with on of these tutorials:

You can get all of the software needed for password cracking from these links.

If you aren’t using drive encryption and you’ve got a tough password, it’s usually much faster to reset the password using one of the tools above, but we like to show you all the different techniques that you can use.

Posted via email from ://allthings-bare

Monday, September 27, 2010

Apple Has Already Approved The Official Google Voice App For iPhone, Expect It Soon

The App Store review office at 1 Infinite Loop has officially frozen over: we’ve gotten word that the official Google Voice application is on its way to the iPhone in the next few weeks. In fact, we’ve heard from a source close to Google that it’s already been approved — Google just needs to revamp the application to work with the iPhone 4 and iOS’s multitasking capabilities. If you’re a Google Voice user and you’re on an iPhone, this is great news.

It’s been a long, long road to get here. Last July, we broke the news that Apple had blocked the official Google Voice application, which eventually sparked an FCC inquiry into the matter. Apple claimed that the application “duplicated existing functionality”, which didn’t do much to convince anyone as it subsequently accepted similar apps. Nothing happened for well over a year, and the odds of Google Voice ever making its way to the iPhone, at least as a native application, seemed bleak.

Everything changed on September 9, when Apple published a set of guidelines telling developers which applications would not be allowed into the App Store — and none of the rules seemed to apply to Google Voice. Rumors started swirling that third-party Google Voice apps might soon make their way to the App Store, and sure enough, a handful of applications have since been approved.

But the existing applications, nice as they may be, are all provided by third parties. We haven’t gotten the chance to use the official Google application, but it’s possible that it will include functionality that the others don’t. Namely, push notifications for inbound SMS and voicemail messages (Google doesn’t provide an API for these, so third parties would have to route these messages through their own servers to offer push notifications).

Reached for comment about the upcoming iPhone application, Google offered this non-answer of a statement:

“We currently offer Google Voice mobile apps for Blackberry and Android, and we offer an HTML5 web app for the iPhone. We have nothing further to announce at this time.”

Posted via email from ://allthings-bare

San Francisco Mayor Gavin Newsom To Speak At TechCrunch Disrupt Tomorrow

San Francisco Mayor Gavin Newsom will be bringing himself, his hair and his smile to TechCrunch Disrupt tomorrow, Tuesday, to speak on a variety of topics. This is now officially a TechCrunch Disrupt tradition – at our last Disrupt event in New York Mayor Bloomberg made a surprise visit and spoke about efforts to bring more startups to New York.

Newsom will discuss the startup ecosystem in San Francisco, and will probably touch on Zynga’s massive new 270,000 square foot office lease. He may also mention that he’s running for Lieutenant Governor of California this year.

Attendees can see Newsom live. Everyone else can watch for free on the TechCrunchTV live stream. We’ll update the agenda shortly with details and timing.

Posted via email from ://allthings-bare

Use Ubuntu Tweak to Purge and Downgrade Third-Party Apps [Linux Tip]

Use Ubuntu Tweak to Purge and Downgrade Third-Party Apps

Use Ubuntu Tweak to Purge and Downgrade Third-Party AppsUbuntu Tweak is a handy way to automatically install and upgrade third-party apps and their auto-updating repositories, but it can also be used to wipe out updates that bring bugs into your system.

Trevor, the Linux aficionado at the How-To Geek's home away from Lifehacker, points out the power of the Package Cleaner section of Ubuntu Tweak, an app we dig for Ubuntu newcomers and a part of our Lifehacker Pack for Linux. Using the Package Cleaner, one can do a deep-cleaning "purge" of the apps from any third-party repository, like those that provide early Mozilla builds, beta or dev Chrome/Chromium browsers, or apps with newer updates than those in the official Ubuntu stacks. Along with removing the application and its repository link, Ubuntu Tweak can automatically downgrade your apps back to how Ubuntu originally had them before you decided to get all cutting edge.

Read up on the link for tips on installing Ubuntu Tweak and cleaning out packages.

Send an email to Kevin Purdy, the author of this post, at kevin@lifehacker.com.


Your version of Internet Explorer is not supported. Please upgrade to the most recent version in order to view comments.

Loading comments ... -/|\\\\\" /></div>  	</div>    	<div class=

In order to view comments on lifehacker.com you need to enable JavaScript.
If you are using Firefox and NoScript addon, please mark lifehacker.com as trusted.

Posted via email from ://allthings-bare

Temporarily Lock Your PC if Somebody Tries to Guess Your Password

Have you ever worried that someone could figure out your password by trying different key combinations?  Here’s how you can prevent this by temporarily locking your computer when the password is entered incorrectly a couple of times.

What we’ll do is use Windows security settings to temporarily lock out the account for 30 minutes whenever the wrong password is entered 3 times. This will prevent them from being able to repeatedly guess your password, or at least make it take a lot longer.

Important Note: This setting can also let somebody prank you by incorrectly entering the password 3 times and lock you out for 30 minutes. It would be wise to have another administrator account that can unlock the regular account. Either way, use caution with this setting.

Secondary Note: if somebody has physical access to your PC, they can easily reset your Windows password with the Ubuntu Live CD, the System Rescue CD, or the Ultimate Boot CD, unless you are using total drive encryption with TrueCrypt or BitLocker.

Change Your Local Security Policy

To change your password settings, open the Local Security Policy settings dialog.

Please Note: Local Security Policy is only available on Business, Professional, Enterprise, and Ultimate versions of Windows 7 and Vista.  If you’re using Starter, Home Basic, or Home Premium, you’ll need to use the Command Prompt method listed below.

To open Local Security Policy, simply enter it in the Start menu search box and select the correct entry.

image

Now, double-click Account Policies on the left and select Account Lockout Policy.

image

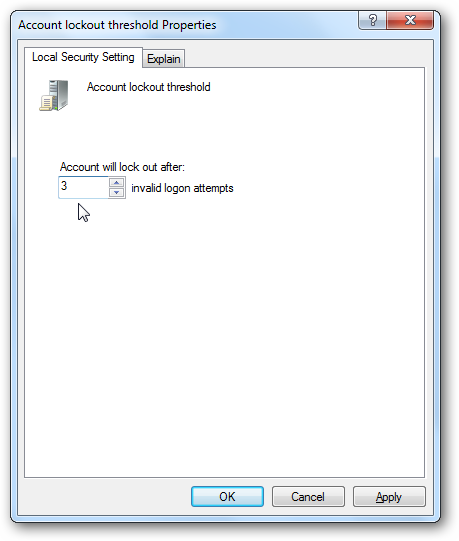
By default, your account should not automatically lock out when the password is entered incorrectly.  To change this, double-click on the Account lockout threshold entry.

image

In this dialog, enter the number of times you want to allow before your account will lock out.  We entered 3, so our account will automatically lock out if the password is entered incorrectly 3 times in a row.  Click Ok to save your settings.

image

Windows will prompt you to set suggested settings for Account lockout duration and the length of time to Reset account lockout counter.  This will choose 30 minutes by default; you can select another time, or go with the defaults by clicking Ok.

image

You’ll now see your new settings in the Local Security Policy dialog.  With our settings, our account will be locked for 30 minutes if the password is entered incorrectly 3 times in a row.  If you want to change the settings, simply repeat these steps and enter the new settings you want.

image

Change Password Settings in Command Prompt

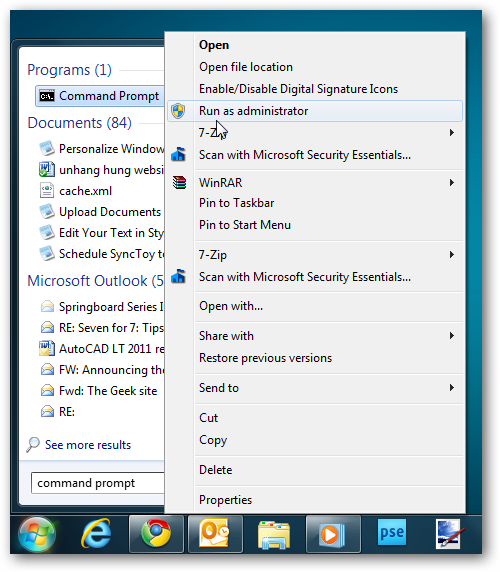
If you’re using a home edition of Windows, or prefer working in command prompt, you can change the password lock settings directly from command prompt.  First, open an Administrative command prompt.  To do this, right-click on the Command Prompt link in the Start menu and select Run as Administrator.

image

Now, in the command prompt, enter the following:
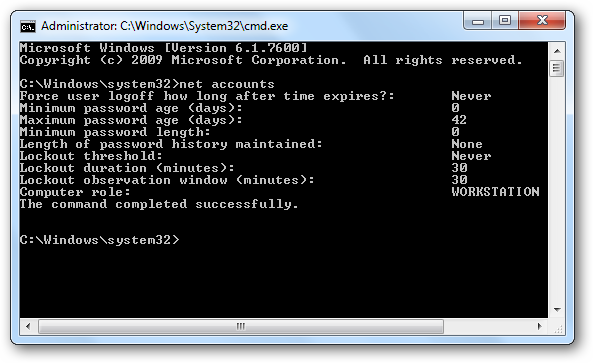
net accounts

This will list your current password policy, which by default should Lockout threshold: Never which means that your account will not lock you out if the password is entered incorrectly.

image

Let’s change this to automatically lock us out when then password is entered incorrectly.

Please Note: Before you proceed, make sure to complete the full directions, or you could permanently lock your accounts on a  Home Premium computer.

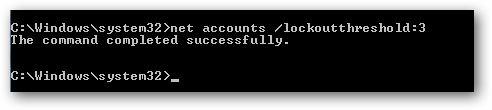
To change the setting and make your login automatically lock you out, enter the following, substituting the number at the end with the number of times you want to allow the password to be entered before the account is locked.  Make sure to set this as 1 or more.

net accounts /lockoutthreshold:3

Here we set the account to lock out after the password is entered incorrectly 3 times.

image

Now, you need to set how long the account will be locked when the password is entered incorrectly.  Enter the following, again choosing any option over 1.  We set our computer to lock for 30 minutes, but you can choose less or more, depending on your needs.

net accounts /lockoutduration:30

Then enter the following to choose how long to wait before the incorrect login count is reset.  We recommend entering the same number you used for the lockout duration.

net accounts /lockoutwindow:30

Once you’re finished, you can enter net accounts again to review your settings.  They should look something like the settings below, depending on what you chose.

image

Now you’re all set.  Your account will automatically prevent people from logging in if the password is entered incorrectly too many times.  If you ever want to change or remove the settings, just repeat the steps with the new options you want.

Let’s see how this works in action.

Logging In With The Password Limit

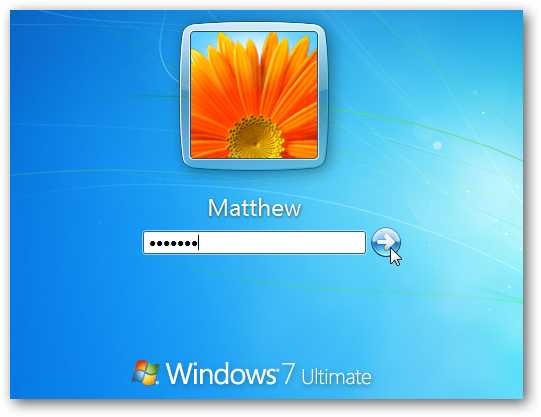
After setting your new password policy, your login experience won’t be much different than before unless you enter your password incorrectly.  The main login screen won’t look any different than before; just select your user account and enter your password as before.

image

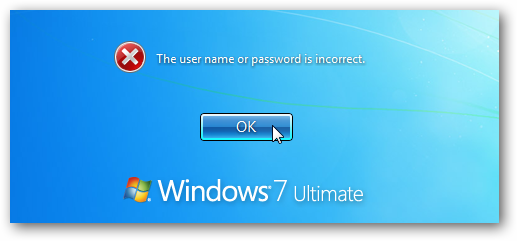
If the password is entered incorrectly, you’ll be prompted that it’s incorrect.  Click Ok, and then go back and enter the password again.

image

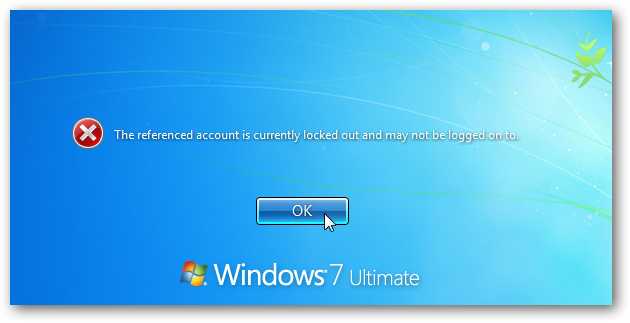
Then, if you enter the password incorrectly more than the number of times you set before, you’ll be prompted that the account is current locked.  You’ll need to wait the length of time you set before you can log in again.  In our test here, we entered the password incorrectly 3 times, and then had to wait 30 minutes before we could try again.

image

While this may not make your computer fully secure, it does help keep people from casually snooping on your computer while it’s running.  This will make it much harder for someone to guess your password, since they’ll be blocked out after entering it incorrectly several times. 

Don’t forget that you can quickly lock your computer by pressing Win+L on your keyboard, which is a good idea if you want to keep your data safe when you’re away from your desk.  Also, you can set your computer to automatically switch to the login screen when you’re away if you wish.

Posted via email from ://allthings-bare

Friday, September 24, 2010

How to Backup Your Linux PC with Simple Backup

It doesn’t matter if you are using Windows, OS X, or Linux, everyone should do regular backups of their information. In Linux one of the easiest ways to do automated backups is with Simple Backup (SBackup). Here is how you can set up SBackup to make sure you have a backup of all your important files.

Install Simple Backup

To install SBackup open your menu and click on the software center. Search for SBackup and install the software from the search results.

Note: These screenshots are taken from Linux Mint 9 but the steps will work on Ubuntu and most Ubuntu based distros.

Configure SBackup

SBackup’s recommended settings assumes you have /var/backup pointing to a separate hard drive. That is usually not the case on personal laptops and desktops so it would probably be a better idea to select custom backup settings and change the settings as you need.

Next click on the include tab and add any files or directories you would like backup up. The backup program runs as root so you are able to backup any directory even if your user does not have access to them.

The next tab will have settings to exclude directories, file types (based on file extension), a regular expression (regex), or based on file size.

By default SBackup doesn’t back up most media files, so if you don’t already have a backup of your videos and music you will want to adjust the settings below to include them in the backups. Just make sure your backup hard drive has enough space to store all the media files.

It would also be recommended to change the max size setting because by default SBackup doesn’t backup anything larger than 95 MB.

The destination tab will allow you to select your destination folder, hard drive, or remote directory.

Although the remote directory only shows SSH and FTP, other protocols like SFTP and SMB are also supported. To enter a different protocol simply add the correct information to the beginning of the path and make sure you have the correct username and password in the path as well. The format for a network path is <protocol>://username:password@server/share. If you are backing up to a remote server you should also check the box to abort if the destination doesn’t exist otherwise the backup will be stored locally on your hard drive.

Alternatively you could also leave out the username:password information in the URI but you will be prompted for your credentials every time the backup starts.

The next tab will allow you to schedule your backups to automatically happen whenever you’d like. The backup uses cron to schedule the jobs so if you know how to use cron you can easily modify the schedule to your liking.

To prevent your hard drive from filling up, change the settings you want on the purging tab to delete old backups.

Once all your settings are the way you want, click save to write the changes to the config file.

Click backup now to test your backup settings and make sure your backup starts.

Note: In Linux Mint 9 and Ubuntu 10.04 there is a bug with SBackup. To run the backup you will need to open a terminal and run “sudo sbackupd &”. To fix this bug you can either upgrade to Linux Mint 10 or Ubuntu 10.10 or compile SBackup 11.2 from source.

Always double check that your backup files are writing successfully, the folder will be time stamped with the date, time, and computer name.

Restore From a Backup

To restore your files, open Simple Backup Restore and select the backup location and the files you would like to restore from the list.

Note: In Linux Mint 9 using SBackup 10.5 I was not able to restore files from my remote directory without mounting the share to a local directory. This should be fixed with SBackup 11.2.

Simple Backup project on Sourceforge

Posted via email from ://allthings-bare