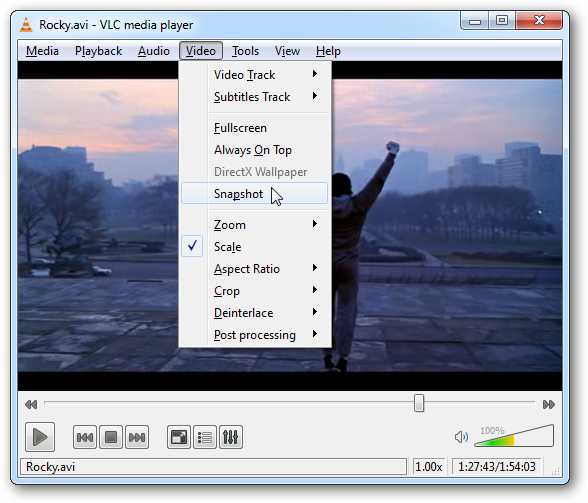
Have you ever wanted to grab a screenshot of your favorite TV or movie scene? Today we’ll show you how to do so with VLC Media Player.
If you don’t have it already, download and install the latest version of VLC (link below). Start playing your movie, and to grab a snapshot, select Video from the menu and click Snapshot.

When you take a snapshot, by default a preview is displayed at the top left and the folder where the file is saved is briefly displayed on the screen.

If you enable the Advanced Controls, you can take a snapshot with a click of a button, and advance the video frame by frame to get a more accurate shot. To enable the Advanced Controls, select View and Advanced Controls.

You’ll see the Advanced Controls buttons appear below the slider. Now just click on the Snapshot button to grab an image.

You can more easily control the frame you wish to grab by pressing the Frame by Frame button. You can pause the movie when it is near the perfect spot for your snapshot, and then press the Frame by Frame button to advance a single frame at a time.

By default, the snapshots are saved as PNG files in your My Pictures folder in Windows. You can change those setting in the Preferences.

First, you’ll need to select All under Show settings at the bottom. Then click on Video on the left. Scroll down a bit and you’ll see the Snapshot section.
Here you can change the format from PNG to JPG, change the directory to which the snapshots are stored, turn on and off the preview, and change the filename prefix. Click Save when finished.

Now you have nice screenshots of your favorite movie to display as you wish…such as a Desktop Background!

VLC is an excellent media player that runs on Windows, Mac, and Linux. In addition to playing almost any media file, it also makes grabbing screenshots of your videos a breeze.
Want to know more about VLC? Check out some of our previous articles like how to rip DVDs and how to set a video as your desktop wallpaper.
Download the Latest version of VLC

| Similar Articles | Productive Geek Tips |
| Latest Software Reviews | Tinyhacker Random Tips |


No comments:
Post a Comment