We’ve shown you how to statically set the IPs on your network, now lets flip that DNS switch for added elegance and ease of use. Today’s guide will show you how to access your machines using DNS names on your DD-WRT enabled router.
Image by Henk L
Preface
On our How To Set Up Static DHCP on Your DD-WRT Router guide, we’ve talked about making sure that your clients will always get the same IP address from the router. So now if you want to access one of the machines on your network, as you know it’s IP, you can use that… but using IPs just doesn’t have the same elegance as using names. Also, with the usefulness of “static IP”s dwindling due to the rise of UPnP, and the inconvenience of setting up “static reservations“ (having to find the MACs and alike)… What if you don’t want to remember IPs at all?
That is where DNS comes in.The Problem
Your trying to reach from one machine/device on your network to the other using its IP address (using ping for example) and it works. However, when trying to do the same using it’s hostname like “mydesktop” or “mylaptop”? it is a hit and miss… sometimes it works…. usually it doesn’t… :\
What is going on?
Your devices don’t know who and how they should ask for the “name” to “IP” translation, because they are missing a key configuration, the “DNS suffix”.
When a computer needs to translate a name to an IP address (called “resolve”) it has a couple of ways to do it, one of the ways is to ask a Domain Naming System (DNS) server. However, to be able to do so, the client must ask the question in the form of a “Fully Qualified Domain Name” (FQDN).
An FQDN consists of the hostname like “mydesktop” and the DNS zone it belongs to like “geek.lan”. So in our example, the FQDNs for the hosts would be “mydesktop.geek.lan” and ”mylaptop.geek.lan” respectively. When a client doesn’t have the “DNS zone” at hand, it is unable to ask the DNS about a “flat” name (a name that doesn’t specify the “DNS zone”). That is, to actually reach your host by name, you would need to ping “mydesktop.geek.lan”.
However, if the DNS suffix was defined in some way (either manually or automatically), the client will automatically try to append it to the requested hostname and ask a DNS server if it can help with the resolve.
With that said, if the DNS suffix is not defined, the client does try to find out the name on its own, using a “DNS broadcast”. The problem with that is that not all clients are configured to answer, or are actually configured to deliberately not answer such a request. In contrast, it would simply be annoying to specify the FQDN every single time.The solution
In order to have the full infrastructure that will fix this problem, one only needs to set the “DNS suffix” on the “DHCP scope” of the *router. Doing so will both make it so the router will now have a “dynamic DNS” server service that clients can register themselves to, make it so the DHCP service it self will do the same for none-self-registering hosts and deliver the “DNS suffix” as part of the “DHCP lease” given to the clients. Therefore making the entire solution a self sustaining, default behaving solution that solves all the problems in one fail swoop…. neat, A?
*When using DD-WRT… with other routers, your mileage may vary.
To do this, go into your router’s Administration page:
- Go into –> Services
- Change, “Used Domain” to be “LAN & WLAN”
- Choose a Domain name, we’ve used “geek.lan” for this example, but you can use *whatever you want.
- While using Static DHCP reservations is optional for this procedure, if you chose to implement it, it is recommended that you set the hostname, to match the one that is set on the machine/device’s OS. Now if it just so happens that the devices OS, doesn’t register a name in DNS (like phones) this is a good way to force one on it.
- Click “Save” –> “Apply Settings”.
*The one exception to that rule, is that if you use “.local”, while your windows machines will probably do just fine, your Linux machines will adhere to the mDNS (Multicast DNS) standard and will again ignore the DNS server. There is a workaround, but it’s beyond the scope of this guide.
Now to check that the settings have taken affect, go to the command line and issue an “ipconfig”.
You should see that your DNS suffix is currently none-existing as below:
Issue an “ipconfig /release” followed by an “ipconfig /renew”, and you should see something like:
Repeat the procedure on at least one more machine and try pinging, using only the hostname name.
You should see that the client has “auto-magically” understood that the full name of the device you’re pinging is “hostname.dns.zone”, and was able to translate (resolve) the FQDN to a ping-able IP:
Troubleshooting
As this guide is about using DNS like the How to Remove Advertisements with Pixelserv on DD-WRT guide was, If you run into problems there are a couple of things to do:
- Clear your personal machines DNS cache.
This is because of a DNS cache, that may fool your computer into thinking it already knows the hostname, without consulting the DNS for it. On windows this would be “ipconfig /flushdns”.- Make sure your client is using the router as the DNS and that it resolves the FQDN.
Especially when using a VPN or a network that is more complex then the normal router to computer setup, it is possible that your client computer is simply not using the router as its DNS. It is very easy to see using the command “nslookup” below what is the DNS server the client is using. If the IP is not the same as the router, you have found the problem.
That’s it… you should be all set
Hurry, all I see is darkness.
Monday, August 22, 2011
How To Access Your Machines Using DNS Names with DD-WRT - How-To Geek


Monday, April 4, 2011
Unleash Even More Power from Your Home Router with DD-WRT Mod-Kit
We’ve already shown you how to mod your home router with the DD-WRT alternative firmware for greatly improved performance, and today we’re going to show you how to take it even further with the DD-WRT Mod-Kit.If you haven’t already, be sure and check out the two previous articles in the series:
- Turn Your Home Router Into a Super-Powered Router with DD-WRT
- How to Boost Your Wi-Fi Network Signal and Increase Range with DD-WRT
Assuming you are familiar with those topics, keep reading. Keep in mind that this guide is a little more technical, and beginners should be careful when modding their router.
Overview
This guide will give a step by step rundown of how to create your own DD-WRT firmware with modifications and additions using the “firmware modification kit“.
The firmware modification kit enables one to make modifications to the firmware without compiling it from source. Making changes this way, with the aid of the provided scripts, becomes a simple matter of downloading, replacing and deleting some files.
The most predominant reason to use this method is because lately DD-WRT’s support for the Openwrt IPKG packages has shifted towards routers that have hard drives (via USB), which makes the mod-kit the only consistently working way of installing the IPKG packages successfully for cases where an HD is unavailable. In addition, this method has the added advantage of relieving you from the JFFS dependency for packages installation, which for routers with only 4MB of flash is a real problem.
Goals
While instructions for this procedure, are detailed on DD-WRT’s wiki and on the developer’s site, we aim to make this guide a copy & paste procedure that anyone can use to achieve the following goals:
- Install the knockd package and its dependencies.
- Install the ssmtp package with NVRAM based generated configurations.
- Optionally with support for TLS smtp (a.k.a. Gmail support).
Once you have followed this procedure it should be relevantly simple to adapt it for other packages installations.
Warning: Tread lightly… keep in mind that incorrect usage of the modification kit, can leave you with a router that needs de-brick-ing (as in turn it into a useless brick). However if you’re a true geek you probably subscribe to the ideology that, he who can destroy a thing, controls a thing, and only true geeks do that
Prerequisites
- Using this procedure can brick your router, as in make your router unusable, we take no responsibility for any damages that may be caused directly or other wise due to the use of the procedures below.
- This procedure was performed on Debian based systems (Lenny, Squeeze and Mint) and the instructions below assume you are using one as well.
- This procedure is only recommended for people who have experience with flashing their router with DD-WRT, with all the prerequisites,caveats and limitations that apply for their hardware setup. a good place to start would be our Turn Your Home Router Into a Super-Powered Router with DD-WRT guide.
- Your router has to support at least the “mini” version of DD-WRT.
- This procedure was created and tested on Linksys WRT54GS/L routers, if your using routers from other vendors, your mileage may very.
Setup
Installing required packages
The firmware modification kit has some dependencies for it to compile and work. In order to install/update them all at once Issue this command in a terminal:
sudo aptitude install gcc g++ binutils patch bzip2 flex bison make gettext unzip zlib1g-dev libc6 subversionDownload the mod-kit
Create a sub-folder, and get the kit from the official SVN:
mkdir firmware_mod_kit
  cd firmware_mod_kit
  svn checkout http://firmware-mod-kit.googlecode.com/svn/trunk/ firmware-mod-kit-read-only
  cd firmware-mod-kit-read-only/trunk/
Download a firmware to work on
The first thing to consider is which version you want to use?
A rule of thumb is: when in doubt use “mini”. This is because as long as your router supports at least the “mini” version, using it gives you all of the most commonly used features without any bloatware. thus leaving both space for the procedures and even some JFFS space for other usages in most cases.Once you’ve decided on a version, it is recommended to use the latest revision of the firmware available, as they tend to have a lot of bug fixes compared to their “stable” counterparts.
At the time of this writing the latest was “03-17-11-r16454″ and this revision is used in the commands that follow.
wget http://www.dd-wrt.com/dd-wrtv2/downloads/others/eko/BrainSlayer-V24-preSP2/2011/03-17-11-r16454/broadcom/dd-wrt.v24_mini_generic.binIn order to make it easier to keep track of what version we are using, rename the downloaded file to represent its version number:
mv dd-wrt.v24_mini_generic.bin dd-wrt.v24_mini_generic-03-17-11-r16454.binThis is of course optional, but the commands below assume that you have renamed the file.
Extracting the firmware
In order to be able to change files within the firmware we need to extract its content into a temporary directory.
The syntax of this command is:
./extract_firmware.sh FIRMWARE_IMAGE WORKING_DIRECTORY
In our case, this would translate to:
./extract_firmware.sh dd-wrt.v24_mini_generic-03-17-11-r16454.bin ./working_dir_mini1Note: The first time you run this command, it builds the mod-kit tools on your system. this happens only once and may take a little while… so be patient…
Installing packages
Now that the firmware is extracted we can install the packages to it.
In general, the procedure is to download the package and its dependencies in the form of an ipk file from the openWRT repository. Once downloaded install them into the extracted firmware using the provided script.The knockd package
Detailed instructions on how to configure and use Knockd will be detailed in a future article, so you may opt to skip this step for now or do it in preparation for the future as Knockd doesn’t take a lot of space anyhow.
Knockd is a daemon that listens to communication events at the link layer for sequences then acts on them.
What this means, is that you can have the device running the daemon not even “listen” on the ports (a port scan will not see them as open) and still make it do something you need, from a single command all the way up to a full script. Using this technique you could trigger the server to perform any sort of operation you need of it remotely (across the internet) without exposing your home network.Knockd has only one listed dependency, so download the package and its dependency by issuing:
wget http://downloads.openwrt.org/backports/rc5/knockd_0.5-1_mipsel.ipk
  wget http://downloads.openwrt.org/whiterussian/packages/libpcap_0.9.4-1_mipsel.ipk
Install the “knock daemon” (knockd) ipk into the firmware:
./ipkg_install.sh knockd_0.5-1_mipsel.ipk ./working_dir_mini1/Install the “packet capture” (libpcap) ipk into the firmware:
./ipkg_install.sh libpcap_0.9.4-1_mipsel.ipk ./working_dir_mini1/As “knockd” can be invoked with an alternate configuration file (how will be explained in a future article), there is no need to perform any other operation and you may skip to the firmware building section, if its all you wanted to install.
The SSMTP package
The SSMTP package enables your router to send Email messages just like we showed in our How To Setup Email Alerts on Linux Using Gmail or SMTP for servers. We promised you back then that we will show how to configure this for DD-WRT and we will now deliver.
This is mainly useful if your going to create scripts on the router that you would like to receive feedback on their operation via email.This package’s setup is a bit more complex then it is on normal Linux systems because of the limitation imposed by an embedded system, so take a deep breath… ready?…. lets go…

Download the package:
wget http://downloads.openwrt.org/backports/rc5/ssmtp_2.61-1_mipsel.ipkInstall the “ssmtp” ipk into the firmware:
./ipkg_install.sh ssmtp_2.61-1_mipsel.ipk ./working_dir_mini1/TLS support (Optional)
SSMTP doesn’t list any other packages as its dependencies, however if you want to be able to use an smtp gateway that requires TLS authentication (i.e. Gmail), you have to install the openSSL pakage as well.
Note: There is a HUGE drawback to doing this in the form of considerably reduced space on the router for JFFS later on. That is, the openSSL package takes about 500K of space from your total of 4MB (for a normal non “mega” supporting router), compound to that the JFFS overhead and you will discover that your left with, but a precious few, blocks of free JFFS space (about 60KB on WRT54GL).As there are still non TLS requiring smtp servers out there (usually your ISP’s), i suggest taking a minute to think if you really need to use the TLS requiring gateway.
If you have decided to enable TLS support despite its disadvantage, download the openSSL package:
wget http://downloads.openwrt.org/whiterussian/packages/libopenssl_0.9.8d-1_mipsel.ipkInstall the “openSSL” (libopenssl) ipk into the firmware:
./ipkg_install.sh libopenssl_0.9.8d-1_mipsel.ipk ./working_dir_mini1/Configurations
There is a limitation with the SSMTP package, that it is not possible to invoke it with an alternate configuration file.
Because the firmware is read-only when its on the router, that means that out of the box we can only hardcode the configuration into the firmware.
However, what if we don’t want to go through all of the firmware modification steps, just to change the Email settings? (for example a password change).To that end, both Jeremy (the firmware mod-kit creator) and myself reached the conclusion (independently if i may humbly add) that the only sane way to do this would be to:
- Make the configuration files location which the ssmtp package points to the read-only location under etc, point to the tmp directory which is writable to at runtime.
- Create a script that would dynamically generate the configurations based off of NVRAM variables at startup.
To achieve that, some additional steps are required…
Symlink the ssmtp configuration directory
As explained above, we need to make the /etc/ssmtp location on the router, point to the /tmp directory as its the only writable place we have on the router at run time. To do this, delete the ssmtp directory that was created by the ipk installer:
rm -rf ./working_dir_mini1/rootfs/etc/ssmtp/Create a new symbolic link that points the /etc/ssmtp on the router’s root file-system, to point to /tmp/etc/ssmtp as an absolute path:
ln -s /tmp/etc/ssmtp/ ./working_dir_mini1/rootfs/etc/ssmtpNote: Even though this looks illogical right now, because we are pointing the package’s configuration directory to a location outside of the firmware modification kit’s working directory, I assure you that this looks totally fine from the routers point of view at run time.
An init script
While it is completely possible to not inject this script into the firmware and run it as a startup script later on, I feel its appropriate to put it here if only as an example for future use.
Originally Jeremy created the script tailored to someone’s request, later on, I adjusted and augmented it to be more compatible with DD-WRT and syslog reporting.Create the new init (startup) script:
vi ./working_dir_mini1/rootfs/etc/init.d/S80ssmtpNote: You may use another editor, I use vi because its consistent with what’s available on the router…
Make this its content:
#!/bin/sh
  #
  # title: ssmtp_nvram.sh
  # author: Jeremy Collake and Aviad Raviv
  # site: http://www.bitsum.com, http://howtogeek.com
  #
  # script to build config file from nvram vars.
  # will work for any config file that uses
  # var=value type pairs.
  #
  # uses prefixes for nvram variables.
  #
  # i.e.
  # ssmtp_hostname=something
  # translates to ssmtp.conf
  # hostname=something
  #
  logger_func()
  {
  logger -s -p local0.notice -t SSMTP_init $1
  }
logger_func "###########Started the SSMTP init run###########"
  logger_func "Creating the etc directory in /tmp"
  [ ! -d /etc/ssmtp/ ] && mkdir -p /tmp/etc/ssmtp/
  CONFIG_FILE=/etc/ssmtp/ssmtp.conf
  NVRAM_PREFIX=ssmtp_
  PACKAGE_NAME=`echo $NVRAM_PREFIX | sed 's/_/ /'`
logger_func "Generating $CONFIG_FILE for package $PACKAGE_NAME"
  #echo $0: generating $CONFIG_FILE for package $PACKAGE_NAME
  echo "#!/bin/sh" > $CONFIG_FILE
  echo "#" >> $CONFIG_FILE
  echo "# auto generated based on nvram by $0" >> $CONFIG_FILE
  echo "#" >> $CONFIG_FILE
if [ -z "`nvram show | grep ssmtp`" ]
  then
  logger_func "It appears that you have not set the NVRAM variables required to generate the conf file"
  logger_func "**Consider** using these commands in you startup script:"
  logger_func "nvram set ssmtp_root=username@gmail.com"
  logger_func "nvram set ssmtp_mailhub=smtp.gmail.com:587"
  logger_func "nvram set ssmtp_hostname=username@gmail.com"
  logger_func "nvram set ssmtp_UseSTARTTLS=YES"
  logger_func "nvram set ssmtp_AuthUser=username"
  logger_func "nvram set ssmtp_AuthPass=password"
  logger_func "nvram set ssmtp_FromLineOverride=YES"
  logger_func "create the NVRAM variables and re-run the init script or reboot for the settings to take affect."
  exit 0
  fi
###########################################################
  #
  # main loop
  #
  SED_COMMAND="s/$NVRAM_PREFIX/ /"
  CONFIG_VARS=`nvram show | grep $NVRAM_PREFIX | sed "$SED_COMMAND"`
  for i in $CONFIG_VARS; do
  echo $i >> $CONFIG_FILE
  done
###########################################################
  #
  # sanity check
  #
  if [ ! -f "$CONFIG_FILE" ]; then
  # echo "$0: ERROR - could not create $CONFIG_FILE. Perhaps there is no symink /etc/XXXX -> /tmp/etc/XXXX ?"
  logger_func "ERROR - could not create $CONFIG_FILE. Perhaps there is no symink /etc/XXXX -> /tmp/etc/XXXX ?"
  fi
  logger_func "###########Finished the SSMTP init run###########"
Make it executable:
chmod +x ./working_dir_mini1/rootfs/etc/init.d/S80ssmtpTake note of the NVRAM waiting variables in the script, it is our responsibility to give them something to work with after we have installed our modified firmware on the router.
Build the modified Firmware
Now that everything is in place, it is time to re-package the modified firmware into a compressed binary that we can flash to the router.
The “build.sh” script syntax is:
./build_firmware.sh OUTPUT_DIR WORKING_DIRECTORYTo do this we use the supplied script, so issue:
./build_firmware.sh output_mini1 ./working_dir_mini1/Once the “build” operation is done, there will be several firmware images waiting to be used in the “output” directory.
You may now flash the file called “custom_image_00001-generic.bin” to your router as you normally would a DD-WRT firmware.
Note: Don’t forget to restore to “factory defaults” before, during and right after the firmware flash.
Post flash steps
Because we made the SSMTP package look for NVRAM variables in order to generate the ssmtp configuration file, we now need to supply it with the missing information.
We will accomplish this by using the web-GUI “Run commands” function.Go to the web-GUI -> “administration” -> “commands” -> paste in the text-box the following:
nvram set ssmtp_root=your-email@gmail.com
  nvram set ssmtp_mailhub=smtp.gmail.com:587
  nvram set ssmtp_hostname=you-email@gmail.com
  nvram set ssmtp_UseSTARTTLS=YES
  nvram set ssmtp_AuthUser=your-gmail-user-name(without the @gmail.com)
  nvram set ssmtp_AuthPass=you-gmail-password
  nvram set ssmtp_FromLineOverride=YES
  nvram commit
Replace the text after the equal (=) sign, with your actual information, And then Hit “Run commands”.
Note: if your using a regular, non TLS using, smtp server the port to use is 25 instead of 587.Now that the SSMTP information is ready for use, you will need to invoke the init script. So you can either reboot the router, Or paste this into the “commands” text-box:
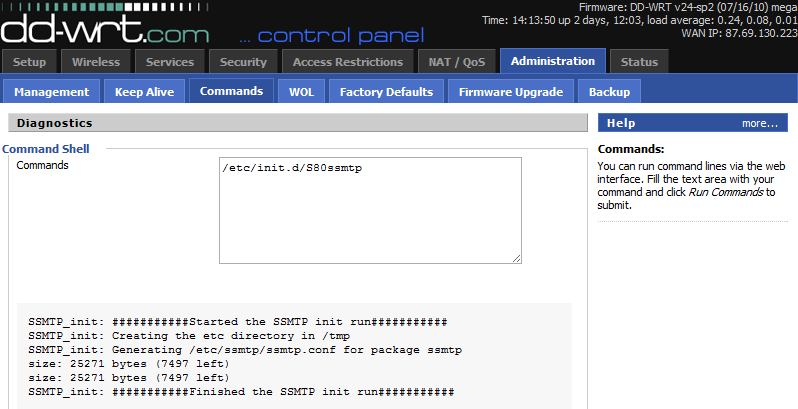
/etc/init.d/S80ssmtpThen hit “Run commands” again.
The output of this command should look like:
Test that you can send Email
Again paste this into the “commands” text-box the following command with your email address:
echo "testing crucible emailing 123 qwe" | ssmtp -vvv your@email.comThen hit “Run commands” again.
Because we used the -vvv option for extra verbosity, the output of this command should look like:
If everything went well, you should be getting the test email within seconds.
We hope that you can use this information to push your home router’s limits even further then you thought possible and you now truly control your home router, and DD-WRT…
Linux extends life, Linux expands consciousness… Linux is vital for packet travel



Thursday, March 24, 2011
How to Boost Your Wi-Fi Network Signal and Increase Range with DD-WRT
Wireless is really convenient until you drop your connection or get really low speeds. Thanks to DD-WRT, it’s easier than ever to extend your home networks range with a few simple tweaks and a spare router.
DD-WRT is a fully feature-packed alternative firmware for your router. If you don’t know what it is or how to get it on your device, you should start off with Turn Your Home Router into a Super-Powered Router with DD-WRT.
Boosting Your Signal
Fire up your web browser and direct it to your router’s configuration page. Go to Wireless > Advanced Settings.
There are three settings of interest, the first being TX Power. This is the broadcasting power of your transmitting antenna. The default is a safe value of 70, but we can kick it up a bit. Most people report that jumping up to a 100 is safe. Pushing it higher can cause excessive heat which can damage your router. I don’t have to worry about that since my “server area” is cold and I’m also a bit reckless, so I kicked mine up to 150. It’s been that way for a few weeks and I haven’t had a problem yet, but your mileage may vary. Use your common sense and discretion.
Next up is the Afterburner setting. If your wireless router and adapters support Afterburner – also known as SpeedBooster, SuperSpeed, Turbo G, and G Plus (but not Super-G) – you can enable this to get a boost. Things may slow down if they don’t support it, though, so be sure to do your homework. B-only devices won’t see any problems and N-based devices shouldn’t be negatively affected, either.
Finally, we get to Bluetooth Coexistence Mode. If you use bluetooth a lot, then you may have noticed a drop in reliability or speed with both wireless and bluetooth devices. Turning this setting on should keep the two from interfering too badly with one another.
Use a Spare Device as a Repeater
Most of us have upgraded our networks with new routers over the years. If you have your old one lying around, why not throw DD-WRT on it? I had a spare Linksys wireless access point, but after putting alternate firmware on it, I had a full-blown router on my hands. We can put our spare device to work as a repeater, which can act as a range-extender for a new section of your house or yard.
Under Wireless > Basic Settings, change the mode to Repeater.
You’ll see two sections, Wireless Physical Interface (wl0), and Virtual Interfaces (wl0.1). The physical interface is going to be receiving the signal from your main router. Plug in the SSID, configure the network mode, and decide if you wanted it to be bridged (connected with the old network) or unbridged (isolated from it). Next, come up with a new SSID for your repeater. This way, you can choose which access point to use, depending on where you are.
Click on save, then go over to the Wireless Security page.
Enter the wireless security settings for your main router, then enter the details for your new repeater’s signal. Lastly, we need to make sure that your repeater is connected to your main router. To do that, go to Status > Wireless.
At the bottom of the page, you’ll see a button that says Site Survey. Click on it.
Find you main router’s wireless SSID and click Join. That’s it! Place your repeater on the other side of your house, but not so far that it doesn’t get a good signal. Then, you can connect to your new repeater and test it out.
Use Your Repeater as a Wireless Receiver
An added benefit of DD-WRT is that you can configure your repeater to act as a wireless receiver for a computer that doesn’t have one. Return to where you configured the repeating function, under Wireless > Basic Settings.
Change the mode to Repeater Bridge. Now, you can plug in a device into the router’s ethernet ports and it’ll act just like it’s wired into your main router. If you’re not using it then you should turn if off, as it can cut your bandwidth otherwise.
If you’re looking to speed up browsing, Removing Advertisements with Pixelserv and Find a Faster DNS Server with Namebench can both help your cause – with or without extended ranges – thanks to DD-WRT.


Tuesday, March 22, 2011
Turn Your Home Router Into a Super-Powered Router with DD-WRT
Wireless is everywhere and routers are the force that makes it happen, so why not supercharge yours to take proper advantage of it? DD-WRT will let you boost your router’s range, add features, and more.
DD-WRT has a ton of features—more than we can cover in this guide, which is focused on helping you get your router upgraded. Stay tuned, as we’ll go into more depth in a couple more days on all the great things you can do with it, but even if you don’t use the additional features, DD-WRT is worth installing to make your router work better.
What Is DD-WRT?
Here’s our router. Behold: the Netgear WNR2000, revision 2. It’s a mighty fine one, too, but it’s still not the best. Why, exactly? Your router is only as good as its firmware, the software that makes it tick. When you buy a router from Linksys/Cisco, Netgear, D-Link, or others, you’re bound to their software. It’s a nice arrangement; you respect their limitations, and they promise to help with your problems. But what if your warranty’s expired, or you want to shuck their limitations? Maybe you want to take your hardware and push it to its most extreme limits. That’s where DD-WRT steps in.
DD-WRT is an open-source alternative firmware for routers. Its software unlocks features that aren’t present on all routers: static routing, VPN, repeating functions, the list goes on. It also unlocks settings that aren’t accessible normally, like antenna power and overclocking.
Router Support
Turning your home router into an almost professional-level tool is a great project that has one major caveat: support. Not all routers are built or designed the same way. Even two of the same model can have different revision numbers with very different internal components. Because of this, the first step is doing plenty of research. It’s best to have a router that’s fully supported, so if you end up buying one, be sure to check the DD-WRT Supported Routers page first. Also make use of their Router Database, which will help you find particular instructions for your model and revision. Most devices have model and revision numbers on the back panel, and if there’s no revision number, it’s safe to assume that it’s 1.0.
For our purposes, the important spec to consider is NVROM, or ROM. This is where the firmware is kept, so even if your router has 16MB of RAM, it won’t work with a 4MB image of DD-WRT without at least that much ROM. Because of this, there are a few different versions of DD-WRT available at varying file sizes. Some are trimmed down to fit in smaller ROM configurations. Others are built with specific features in mind, like VPN, SD card support, or a Samba client. For more information, check out the File Versions table.
Preparation
The most important thing in any project is research. Do all of your homework for this one, because (here it comes):
DISCLAIMER: Changing your router’s firmware can result in unintentional consequences, such as “bricking.” It’s unlikely, and we’ve never had a device that couldn’t be fixed in some way, but it’s important to understand that it’s a very real possibility. Just to be clear: you assume all responsibility for anything you do; we’re not liable for anything that should go wrong.
As mentioned above, start with the Supported Devices page to see if you’ve got a DD-WRT-friendly router. If you don’t see anything specific, or even if you do, check into the Router Database. Here, you’ll find links to forum pages of those who’ve completed the process for specific models/revisions, as well as the setbacks and workarounds they’ve found. Most importantly, you’ll find links to compatible versions of firmware.
The friendly forum gave us some useful info for our particular model. Our router, the Netgear WNR2000 is revision 2, which means it’s compatible (revision 1 is not). It’s only got 4MB of ROM, so we had to stick to the mini version. We followed the download links and read up on what to do to complete the procedure in full detail.
Almost all sources unanimously recommend three specific things:
- Do a hard reset on your router before you update. This usually requires a 30/30/30 procedure.
- Hard wire your router when you update the firmware. NEVER over wireless.
- Use Internet Explorer (or Safari) unless specifically stated that other browsers are okay.
There’s a ton of reasons which the documentation will reveal to you, but the first two are written in stone, and the last has held true for almost any router, and it won’t hurt either.
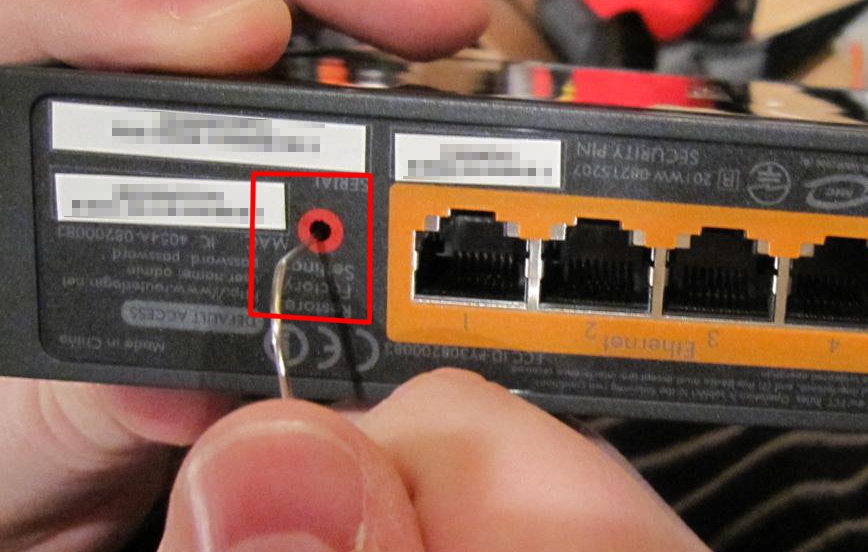
Most routers have a pinhole on their back with you need to push and hold to perform a hard reset. The 30/30/30 procedure is primarily directed for devices with DD-WRT already on them, but it’s also required for some other models and won’t hurt to do anyway. It deletes the Non-Volatile RAM. From the DD-WRT website, the procedure is as follows:
- With the unit powered on, press and hold the reset button on back of unit for 30 seconds
- Without releasing the reset button, unplug the unit and hold reset for another 30 seconds
- Plug the unit back in STILL holding the reset button a final 30 seconds (please note that this step can put Asus devices into recovery mode…see note below!) [Note]
This procedure should be done BEFORE and AFTER every firmware upgrade/downgrade.
Do not use configuration restore if you change firmware builds (different svn build numbers).
The Process
Hard reset, as outlined above, or per the instructions for your specific router.
So after our hard reset, we waited for the lights to return to normal, and we hard-wired the router to our laptop. During this phase, we turned off the wireless connection so that just the wired connection to our WRN2000 was active. This prevents any mishaps and makes it simple to connect to the web-interface through the defaults.
Next, fire up Internet Explorer and go to your router’s default page, and log in.
Use the default username and password, usually printed on your device’s back panel or easily found on the internet.
Click on the Router Upgrade link.
Browse to the correct image and click Upload, and wait patiently. Very patiently. You’ll see the loading screen tell you to wait while the router reboots, and you’ll see the lights flash on and off for a while. Wait about five minutes, and err on the longer side. When you’re ready, log in to your router. DD-WRT’s IP address is 192.168.1.1, the username is ‘root’, and the password is ‘admin’.
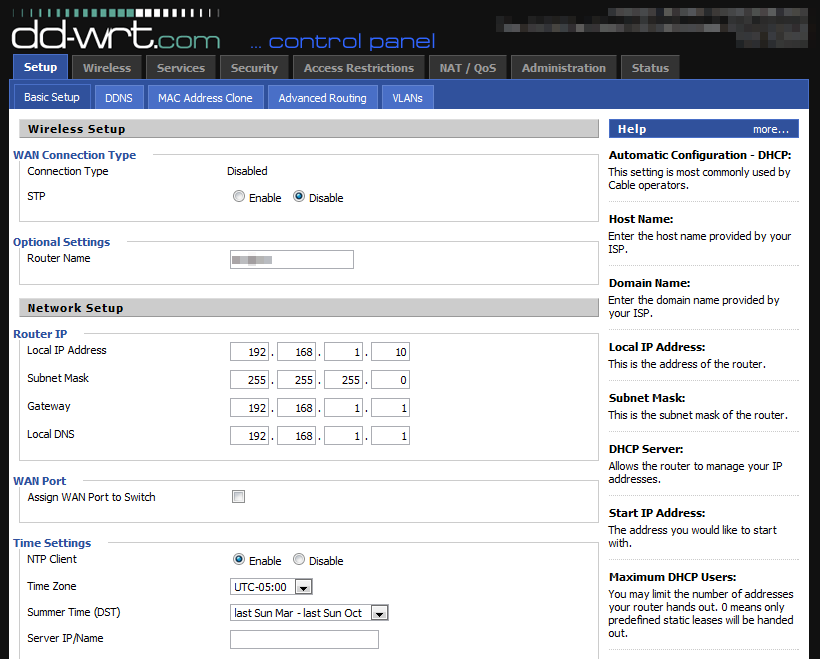
You’ll be greeted with your brand new interface.
If things didn’t work out, you may have had a “bad” flash. Your router may be bricked, but odds are you can recover from it in some fashion. The first place to check out is How to Recover From a Bad Flash, and the second is the DD-WRT Forum. As long as your do your homework and be precise with the instructions, you’ll be fine.




Thursday, February 10, 2011
Get More Out of Your DD-WRT Router with an External Drive
Joshua Tyler —
You've supercharged your router with DD-WRT, you're using it to monitor your bandwidth use, and yet you still wish it could do more. Well it can; today we're looking at how to connect to and use your router with an external USB drive.
DD-WRT is pretty powerful by default, but it isn't perfect. Most of the system is read-only, with the editable configuration stored in nvram, which means you have a Linux router that you can't tweak as freely as a normal Linux system. Some routers, however, have a USB port that can be used to connect external storage; using this, we can replace parts of the read-only filesystem with directories on the writable external disk.
Benefits of doing this include a writable /etc/ for easier software configuration, the ability to add new users, and easier use of ipkg for new software installation. It sounds extreme, but it's quite safe! Nearly every change made is to the external storage, which is loaded over the read-only filesystem. The original data is left unharmed, so you can undo the entire thing by disconnecting the storage device and rebooting.
Before We Begin
Most of this guide assumes your router is one of the models that has USB support. For this guide, we'll be using the Buffalo WZR-HP-G300NH, but any DD-WRT router with a USB port should work. If yours isn't one, don't worry! We'll cover some alternatives and their pros and cons, too.
You will also need access to Linux or a Linux live-CD (preferably GParted Live CD), some type of removable storage, such as an external hard disk or a USB flash drive, and most importantly, you need a router with DD-WRT installed. If you're using the G300NH, you don't have to do anything; DD-WRT is installed by default. For the others, you should refer to our guide or the DD-WRT wiki.
Preparing the Drive
Boot your Live CD and run GParted, then connect the USB device you want to reformat and use. If it's automatically mounted, right click the drive icon and choose "Unmount". In Gparted, select the proper device from the dropdown at the upper right of the window. Make sure you're using the right device by checking the device capacity information in parentheses. When you choose, the rest of the window will update to show the partition information of the selected device.Under the Device menu, choose Create Partition Table and press Apply to create a new MS-DOS partition table. Right click "Unallocated Space" and select New. The first partition should take most of the space, leaving only a small amount (around 64MiB) at the end. This first partition should be a Primary Partition, and the filesystem should be ext2 (for flash drives) or ext3 (for an external hard disk). You'll need to know what filesystem type you used later, so make a note of it now. The label can be anything you like.
Right click the remaining unallocated space and create a second new partition. The size should be all remaining space (64MiB), it should be a primary partition, and the filesystem should be linux-swap. Some routers can make use of the swap space for extra memory, but others may not be able to (the G300NH cannot), so don't set this too high in case it cannot.Click the green check box to apply all changes and wait. When it's done, your drive will be ready for its new life attached to your router.
Router Setup
Now that you have a drive ready to use, you need to prepare the router for its use. To do that, you will change some settings via the web interface, so fire up a new tab and enter your router's IP address. After you've logged in, click the Services link at the top and scroll down to the "Secure Shell" section. Enable SSHd and Password Login and save your settings.Next, click the USB tab. There, you'll need to enable the following: Core USB Support, USB 2.0 Support, USB Storage Support, and ext2 / ext3 file system support. Set the Disk Mount Point to /mnt/ and apply your settings.
Your router is ready for USB storage, so go ahead and plug in the drive now.
Mounting the Drive
The rest of this guide will rely heavily on the command line, so if you're CLI shy, you my want to get familiar with it with our command line primer. Connect to your router via SSH (ssh in Linux and OS X; use PuTTY or KiTTY in Windows) and log in with the username root and your router's password.
Once you're in, typecd /dev/discs/;lsand thencdto the directory listed (probably disc0). Anotherlswill list the partitions available, which should be part1 (the storage) and part2 (swap space). Make note of filename and the path you used to get here (e.g. /dev/discs/disc0/part1), because it's important.The drive is connected and we have the location of the device itself, but the filesystem isn't attached (or mounted) to any locations yet, so next we use the path to the device file to mount the partition. Type in
mount -t ext2 /dev/discs/disc0/part1 /mnt, replacing ext2 with ext3 if necessary. Typemountagain with no arguments and the last line will be similar to/dev/discs/disc0/part1 on /mnt type ext2 (rw,data=ordered)if it was successful.If it worked, the next step is to make the partition mount at bootup by typing
nvram set rc_startup="mount -t ext2 /dev/discs/disc0/part1 /mnt/"(Don't forget to change ext2 and the /dev/ path if needed!)Preparing the Filesystem
Now the drive is mounted, but most of your filesystem is still read-only. Let's fix that. The first step is to create something that resembles a normal root filesystem inside /mnt/. Change directory to /mnt (
cd /mnt) and thenmkdir bin etc home jffs lib opt root sbin tmp usr var www; chmod 1777 tmp. Now you have a bunch of directories that can be mounted over existing read-only location. Not every directory created will be used in this guide; the extra ones are for additional tweaking if it is needed later.One of the goals to this is to replace /etc with /mnt/etc, but that won't work unless the needed files exist.
cp -a /etc /mnt/; cd /mnt/etc/will copy everything from /etc/ into /mnt/etc/, preserving all attributes, and then switch to that directory. Next,mkdir passwd.d group.d; mv passwd passwd.d; mv group group.dPutting it to Work
Everything is in place, we just need a simple shell script, so it's time to fire up vi. If you don't know vi or don't like it, don't worry, it won't last long. Type
vi /mnt/mount.shto start creating the file, press i to enter insert mode, and put this in the file:Now press escape to leave insert mode, then :wq to save and quit. Make the file executable with
chmod u+x /mnt/mount.shand your script is ready. Run it with/mnt/mount.shand you'll have writable directories in /opt, /jffs, /usr/local, /etc/, and root's home directory without causing any damage to the original filesystem.Left like this, your router will return to its default mostly read-only state when you reboot the router; if you want the writable system and any changes you've made to the configurations and other parts, you'll have to run the mount.sh script manually again. If you decide you like the change and want to make it automatic, you can add it to the previous automount with the following command:
nvram set rc_startup="`nvram get rc_startup` && /mnt/mount.sh"It's still not permanent and you can always revert to the original read-only state by removing the USB storage and rebooting the router.
Extra Credit
You've gotten this far and now you want to know what you can do with the modified system. Root's home directory is now available on the removable drive instead of in RAM, so you can store files and user settings and not have them reset on reboot. Likewise, /etc is editable, so you can change system configurations. We can put that to use and make installing software easier.
echo PATH=/usr/local/bin:/usr/local/sbin:$PATH > .profileThe next time you log in to the router, /usr/local/bin and /usr/local/sbin will be at the top of your search path, so you can put your own scripts in there (don't forget to make them executable) and run them by name. One use of this is to fix a problem with the ipkg script that is distributed with DD-WRT. The script tries to use the
--passive-ftpswitch with wget, but the DD-WRT built-in doesn't accept it, which leaves the entire thing broken.cp /bin/ipkg /usr/local/binand now you can edit the script and remove the--passive-ftpswitch.While you're editing files, you'll want to look at /etc/ipkg.conf. The supplied package list is most likely older and only usable for certain chipsets (mipsel), so you may need to change repositories. For example, if you're using a Buffalo router, it uses an Atheros chipset, so you can't use packages from the default whiterussian release. Comment out those lines with # and add
After you have ipkg fixed and configured, runsrc kamikaze http://downloads.x-wrt.org/xwrt/kamikaze/snapshots/atheros/packagesinstead for the G300NH.ipkg update. You can now list, search for, and install packages with it. If you're not a vi fan, your first install will probably be nano. (Sorry emacs lovers, but it doesn't seem to be available) You may also be able to install swapon and make use of that small swap partition, though it doesn't work on all chipsets and couldn't be tested for this guide.You can also create new user accounts, though you need access to the htpasswd command and you have to add them by hand-editing the passwd file. On a system that has htpasswd installed, you can run it with the -n switch and then paste the encrypted password into the appropriate place in the /etc/passwd file. Adding new users without a good understanding of what you're doing can be a security risk, so we suggest learning more about the passwd file before trying to add users.
A special note about adding users: when you run the mount script, it reads all the files in /mnt/etc/passwd.d/ and creates a new passwd file from them. If you decide to add new users, create a new file there so that it doesn't cause problems with the users created by the firmware at bootup.
Depending on the router's hardware, there is a wide variety of software that can be added now, including some that expect an editable /etc. There are text-based browsers, IRC clients and servers, image manipulation tools, and more. Your router is now super-powered; happy hacking!
But My Router Doesn't Have USB!
If your router isn't endowed with a USB port, there's still some hope. You can still power up the router by following instructions on setting up JFFS and then adapting everything from "Preparing the Filesystem" onward. This has the disadvantage of putting a lot of wear on the router's flash memory, however, so it's not suggested. Instead, consider purchasing a router with USB support when you replace your current one.
Saturday, December 11, 2010
How to Setup a VPN Server Using a DD-WRT Router
We have previously covered how to set up a PPTP VPN Server using Debian Linux here on Sysadmin Geek, however if you are already utilizing a DD-WRT firmware based router in your network then you can easily configure your router to act as the PPTP VPN Server.
DD-WRT Configuration
Before setting up the VPN Server, you must first make sure your installed build of DD-WRT includes the PPTP VPN features. The DD-WRT feature list shows this as “PPTP / PPTP Client” on their chart. Check the installed version on your router (which you can see in the upper right corner on the configuration pages) against the chart. If the feature is not included in your build, you will need to flash your router with a DD-WRT version which does include the “PPTP / PPTP Client”.
To turn on the PPTP VPN Server, navigate to the Services tab and then the VPN sub-tab and select the option to enable the PPTP Server.
Once enabled, several previously hidden options will appear. Configure them as follows:
- Server IP: Public IP address of the router
- Client IP(s): List of local IP’s (respective to the VPN network) to use when assigning IP addresses to clients connecting through the VPN. In our example, we are setting aside 5 IP addresses (192.168.16.5, .6, .7, .8, .9) for use by the VPN clients.
- CHAP-Secrets: User name and passwords for VPN authentication. The format is “user * password *” (user[space]*[space]password[space]*), with each entry on its own line. In our example, there is just a single accepted user name (jfaulkner) and password (SecretPassword1).
You can view detailed documentation on all of these options by clicking the “Help more…” link on this page on the right side of the DD-WRT configuration.
Once you are finished, click the Apply Settings button to push the configuration through to your DD-WRT router and you are finished.
Connecting to the PPTP VPN Server
Once you have your DD-WRT router configured, all that is left is to simply connect your client computers to the VPN. For our example, we will be showing how this is done using Windows 7 Professional.
In the Network and Sharing Center of the Control Panel, click the option to set up a new network connection.
Select the option to connect to a workplace VPN.
If you have existing connections, they will be displayed here. For our example, we want to create a new connection.
Select the option to use your Internet connection to connect to the VPN.
Enter the domain or IP address of your VPN Server (the public IP address of the DD-WRT router configured above) and give a title to the VPN connection.
Enter the credentials for your VPN login which was configured in the DD-WRT router settings. Click Connect.
After a few moments, if everything is configured correctly, you should be connected to the PPTP VPN Server on the DD-WRT router.
Running ‘ipconfig’ on the local machine should show you are connected to both the VPN and your existing internet connection.
Once connected, you can now access all the resources on the VPN as though you were connected to the network locally.


Monday, November 15, 2010
How to Setup a VPN Server Using a DD-WRT Router
We have previously covered how to set up a PPTP VPN Server using Debian Linux here on Sysadmin Geek, however if you are already utilizing a DD-WRT firmware based router in your network then you can easily configure your router to act as the PPTP VPN Server.
DD-WRT Configuration
Before setting up the VPN Server, you must first make sure your installed build of DD-WRT includes the PPTP VPN features. The DD-WRT feature list shows this as “PPTP / PPTP Client” on their chart. Check the installed version on your router (which you can see in the upper right corner on the configuration pages) against the chart. If the feature is not included in your build, you will need to flash your router with a DD-WRT version which does include the “PPTP / PPTP Client”.
To turn on the PPTP VPN Server, navigate to the Services tab and then the VPN sub-tab and select the option to enable the PPTP Server.
Once enabled, several previously hidden options will appear. Configure them as follows:
- Server IP: Public IP address of the router
- Client IP(s): List of local IP’s (respective to the VPN network) to use when assigning IP addresses to clients connecting through the VPN. In our example, we are setting aside 5 IP addresses (192.168.16.5, .6, .7, .8, .9) for use by the VPN clients.
- CHAP-Secrets: User name and passwords for VPN authentication. The format is “user * password *” (user[space]*[space]password[space]*), with each entry on its own line. In our example, there is just a single accepted user name (jfaulkner) and password (SecretPassword1).
You can view detailed documentation on all of these options by clicking the “Help more…” link on this page on the right side of the DD-WRT configuration.
Once you are finished, click the Apply Settings button to push the configuration through to your DD-WRT router and you are finished.
Connecting to the PPTP VPN Server
Once you have your DD-WRT router configured, all that is left is to simply connect your client computers to the VPN. For our example, we will be showing how this is done using Windows 7 Professional.
In the Network and Sharing Center of the Control Panel, click the option to set up a new network connection.
Select the option to connect to a workplace VPN.
If you have existing connections, they will be displayed here. For our example, we want to create a new connection.
Select the option to use your Internet connection to connect to the VPN.
Enter the domain or IP address of your VPN Server (the public IP address of the DD-WRT router configured above) and give a title to the VPN connection.
Enter the credentials for your VPN login which was configured in the DD-WRT router settings. Click Connect.
After a few moments, if everything is configured correctly, you should be connected to the PPTP VPN Server on the DD-WRT router.
Running ‘ipconfig’ on the local machine should show you are connected to both the VPN and your existing internet connection.
Once connected, you can now access all the resources on the VPN as though you were connected to the network locally.


 Posts
Posts


