
The iWork apps are some of the best apps on iPad, and each show just how powerful a touchscreen device can be with the most basic of computing functions: creating and editing documents, spreadsheets, and presentations. They each work quite well with their respective Microsoft Office counterparts also. In fact, there’s not much to dislike about the iWork apps.
Except for one thing: importing and exporting files. You can open documents from email attachments, download them from websites, or import them from other apps like Dropbox. Once you’ve opened your file in Pages, Keynote, or Numbers on iPad, though, you can only send it via email, upload it to a WebDAV server or Apple’s iDisk service, or wait to sync it with iTunes on your computer. Most other iOS office apps don’t offer nearly as many features as the iWork apps, but they do offer deep integration with Dropbox which makes it easy to view and edit your documents no matter where you are. Dropbox is the most popular file sync and sharing solution, and makes it absolutely painless to share folders with anyone around the world and keep your computers in sync. That is, computers and applications that integrate with Dropbox.
However, you don’t need to give up on using Dropbox with iWork apps on iPad. Today we’re going to look at how you can enable WebDAV compatibility on your Dropbox account to let Pages integrate nearly the whole way with Dropbox. It’s not a perfect solution, but it’s much better than the default setup. So let’s get started!
Add WebDAV to Your Dropbox With DropDAV
WebDAV was one of the first standards for file syncing with a server, but it’s not used nearly as much nowadays. Dropbox doesn’t include support for WebDAV syncing, using instead their own syncing system to keep your Dropbox folder synced between the cloud and your computers. Third-party developers have filled in the gaps, and now with several new web services you can add WebDAV support to your Dropbox account.
There are actually two main services that add WebDAV support to your Dropbox account: DropDAV limited, an opensource app powered by Google App Engine, and DropDAV, a premium WebDAV for Dropbox offering. We’re going to use DropDAV in this example, but both services work very similarly. The biggest difference is that the open source DropDAV limited only lets you upload or download files 1Mb in size or smaller, where DropDAV doesn’t have a file size limitation but does charge for premium accounts if your Dropbox is larger than 50Gb.
To get started, just head over to DropDAV’s site and sign in with your Dropbox email and password to add WebDAV to your account. If your Dropbox account is smaller than 50Gb, you’ll never need to pay; otherwise, you’ll get a free 14 day trial before you’ll have to setup a premium account. As soon as your account is activated, you’ll be ready to add it to your iWork apps. Alternately, you can login to your account and change your email and password to make it different from your Dropbox account if you wish.
Dropbox, meet iWork
You’re now ready to add your new Dropbox WebDAV account to your favorite iWork apps. Open Pages, Numbers, or Keynote on your iPad, then tap the export button under a document and select Copy to WebDAV.
Enter your DropDAV server address, then enter your Dropbox username and password. In general, your server address will be https://dav.dropdav.com/, then your username is your Dropbox account email address and your password is your Dropbox password or the password you added to your DropDAV account. Once you’ve added an account, you can keep using it from that app unless your password changes, though you will need to add it individually to each iWork app you wish to use with Dropbox.
Uploading Documents to WebDAV from iWork Apps
You’re now ready to start uploading documents or downloading documents from this app. As soon as your account is verified, you’ll be asked to select what format to upload. And, the next time you upload a document via WebDAV, you’ll just see this screen since your WebDAV server has already been added. In each app, you can export files as the default Pages, Keynote, or Numbers format, respectively, in their respective Microsoft Office Formats, or as PDF. If you plan to edit the files on your iPad again or in iWork on a Mac, I’d recommend always saving a copy in the native format, as well as in the format you wish to share. Either which way, you can only export as one format at once.
Now, the app will connect to your Dropbox account. Seconds later, you’ll see all of your folders listed. Browse to the folder you want to save the document in, then tap Copy to upload it.
Your iWork app will then convert your document to the correct format and upload it to the server. It may take a few minutes, depending on your document size and your connection speed. Once it’s uploaded, though, you can access it from your computer, online Dropbox account, or directly from your iWork app.
Download Documents from WebDAV to iWork Apps
Speaking of which, now that you’ve added Dropbox as WebDAV in your iWork app, you’ll be able to open and edit files from your Dropbox that you’ve saved from iWork or any other Office app. From the iWork app home screen, tap the download button and select Copy from WebDAV to get started opening files from Dropbox.
If you’ve already added your Dropbox account, you’ll automatically see all of your folders and files from Dropbox listed. Browse to the file you want to edit, and then tap it to download the file to your device. Here’s the formats that each iWork app supports, from the Apple iWork for iPad support site:
iWork App Importable File Types Keynote .key .ppt .pptx .pps .ppsx — — — Pages .pages .doc .docx .dotx .txt — — — Numbers .numbers .xls .xlsx .xlt .xltx .xlsm .xla .csv
Your file will start downloading, showing at first the file format logo. Again, it may take a while if your file is large, but for most documents and spreadsheets, it only takes a few seconds. Once it’s downloaded, you’ll see a thumbnail of the document in your file list just like you would from any other document.
Most files open great once their imported, though you may see warnings about any parts of the documents that aren’t supported. For example, this document used the Calibri font, so Pages substituted it with Helvetica. You may have to tweak documents a bit to work best across platforms, but for the most part it’s seamless working with documents from any common Office app.
Once you’ve edited a document, you can just repeat the steps above to re-upload it to your Dropbox. It’s still not full Dropbox integration, but it’s way better than the default setup!
Removing DropDAV From Your Account
Both DropDAV services use Dropbox’ API to integrate with your account and use SSL connections, so your accounts and personal information should be secure when using them. If you ever want to remove them, however, you can always delete your DropDAV account or deactivate from your Dropbox Apps list in your Dropbox settings. You can also try both out and change to the one that suites your needs best.
Conclusion
This is yet another example of how third party developers and an ecosystem of apps and services can make a product even more useful. With WebDAV access to your Dropbox account, the iWork apps on iPad are much more useful. Now, you can always access all of your Dropbox files and upload files to the folder you want wherever you are.
Links:
Download the iWork Apps for iPad: Pages, Keynote, and Numbers [$9.99 each | iPad only]
Monday, February 7, 2011
Integrate Dropbox with Pages, Keynote, and Numbers on iPad | Techinch
![sshot-2011-02-02-[2]](http://techinch.com/wp-content/uploads/2011/02/sshot-2011-02-02-2.png "sshot-2011-02-02-[2]")


![sshot-2011-02-02-[6]](http://techinch.com/wp-content/uploads/2011/02/sshot-2011-02-02-6.png "sshot-2011-02-02-[6]")


![sshot-2011-02-02-[4]](http://techinch.com/wp-content/uploads/2011/02/sshot-2011-02-02-41.png "sshot-2011-02-02-[4]")
Friday, February 4, 2011
How to Integrate Dropbox with Pages, Keynote, and Numbers on iPad

The iWork apps are some of the best apps on the iPad, and each show just how powerful a touchscreen device can be with the most basic of computing functions. In fact, there’s not much to dislike about the iWork apps, except for one thing: importing and exporting files.
You can open documents from email attachments, download them from websites, or import them from other apps like Dropbox. Once you’ve opened your file in Pages, Keynote, or Numbers on iPad, though, you can only send it via email, upload it to a WebDAV server or Apple’s iDisk service, or wait to sync it with iTunes on your computer. Most other iOS office apps don’t offer nearly as many features as the iWork apps, but they do offer deep integration with Dropbox which makes it easy to view and edit your documents no matter where you are. Dropbox is the most popular file sync and sharing solution, and makes it absolutely painless to share folders with anyone around the world and keep your computers in sync. That is, computers and applications that integrate with Dropbox.
However, you don’t need to give up on using Dropbox with iWork apps on iPad. Today we’re going to look at how you can enable WebDAV compatibility on your Dropbox account to let Pages integrate nearly the whole way with Dropbox. It’s not a perfect solution, but it’s much better than the default setup. So let’s get started!
Add WebDAV to Your Dropbox With DropDAV
WebDAV was one of the first standards for file syncing with a server, but it’s not used nearly as much nowadays. Dropbox doesn’t include support for WebDAV syncing, using instead their own syncing system to keep your Dropbox folder synced between the cloud and your computers. Third-party developers have filled in the gaps, and now with several new web services you can add WebDAV support to your Dropbox account.
There are actually two main services that add WebDAV support to your Dropbox account: DropDAV limited, an opensource app powered by Google App Engine, and DropDAV, a premium WebDAV for Dropbox offering. We’re going to use DropDAV in this example, but both services work very similarly. The biggest difference is that the open source DropDAV limited only lets you upload or download files 1Mb in size or smaller, where DropDAV doesn’t have a file size limitation but does charge for premium accounts if your Dropbox is larger than 50Gb.
To get started, just head over to DropDAV’s site and sign in with your Dropbox email and password to add WebDAV to your account. If your Dropbox account is smaller than 50Gb, you’ll never need to pay; otherwise, you’ll get a free 14 day trial before you’ll have to setup a premium account. As soon as your account is activated, you’ll be ready to add it to your iWork apps. Alternately, you can login to your account and change your email and password to make it different from your Dropbox account if you wish.
Dropbox, meet iWork
You’re now ready to add your new Dropbox WebDAV account to your favorite iWork apps. Open Pages, Numbers, or Keynote on your iPad, then tap the export button under a document and select Copy to WebDAV.
Enter your DropDAV server address, then enter your Dropbox username and password. In general, your server address will be https://dav.dropdav.com/, then your username is your Dropbox account email address and your password is your Dropbox password or the password you added to your DropDAV account. Once you’ve added an account, you can keep using it from that app unless your password changes, though you will need to add it individually to each iWork app you wish to use with Dropbox.
Uploading Documents to WebDAV from iWork Apps
You’re now ready to start uploading documents or downloading documents from this app. As soon as your account is verified, you’ll be asked to select what format to upload. And, the next time you upload a document via WebDAV, you’ll just see this screen since your WebDAV server has already been added. In each app, you can export files as the default Pages, Keynote, or Numbers format, respectively, in their respective Microsoft Office Formats, or as PDF. If you plan to edit the files on your iPad again or in iWork on a Mac, I’d recommend always saving a copy in the native format, as well as in the format you wish to share. Either which way, you can only export as one format at once.
Now, the app will connect to your Dropbox account. Seconds later, you’ll see all of your folders listed. Browse to the folder you want to save the document in, then tap Copy to upload it.
Your iWork app will then convert your document to the correct format and upload it to the server. It may take a few minutes, depending on your document size and your connection speed. Once it’s uploaded, though, you can access it from your computer, online Dropbox account, or directly from your iWork app.
Download Documents from WebDAV to iWork Apps
Speaking of which, now that you’ve added Dropbox as WebDAV in your iWork app, you’ll be able to open and edit files from your Dropbox that you’ve saved from iWork or any other Office app. From the iWork app home screen, tap the download button and selectCopy from WebDAV to get started opening files from Dropbox.
If you’ve already added your Dropbox account, you’ll automatically see all of your folders and files from Dropbox listed. Browse to the file you want to edit, and then tap it to download the file to your device. Here’s the formats that each iWork app supports, from the Apple iWork for iPad support site:
iWork App Importable File Types Keynote .key .ppt .pptx .pps .ppsx — — — Pages .pages .doc .docx .dotx .txt — — — Numbers .numbers .xls .xlsx .xlt .xltx .xlsm .xla .csv
Your file will start downloading, showing at first the file format logo. Again, it may take a while if your file is large, but for most documents and spreadsheets, it only takes a few seconds. Once it’s downloaded, you’ll see a thumbnail of the document in your file list just like you would from any other document.
Most files open great once their imported, though you may see warnings about any parts of the documents that aren’t supported. For example, this document used the Calibri font, so Pages substituted it with Helvetica. You may have to tweak documents a bit to work best across platforms, but for the most part it’s seamless working with documents from any common Office app.
Once you’ve edited a document, you can just repeat the steps above to re-upload it to your Dropbox. It’s still not full Dropbox integration, but it’s way better than the default setup!
Removing DropDAV From Your Account
Both DropDAV services use Dropbox’ API to integrate with your account and use SSL connections, so your accounts and personal information should be secure when using them. If you ever want to remove them, however, you can always delete your DropDAV account or deactivate from your Dropbox Apps list in your Dropbox settings. You can also try both out and change to the one that suites your needs best.
Conclusion
This is yet another example of how third party developers and an ecosystem of apps and services can make a product even more useful. With WebDAV access to your Dropbox account, the iWork apps on iPad are much more useful. Now, you can always access all of your Dropbox files and upload files to the folder you want wherever you are.
Download the iWork Apps for iPad: Pages, Keynote, and Numbers [$9.99 each | iPad only]
Signup for a Free Dropbox Account
Techinch covers technology tips, reviews, and how-to articles, and it’s powered by the mighty writing skills of former How-To Geek writer Matthew Guay. You can keep up with his posts through RSS, Facebook, or Twitter. Original post republished with permission.


Monday, October 25, 2010
Print Files From Anywhere via Any Device With Dropbox
Have you ever wanted to print something from your iPhone, or needed to print something on your office printer from your netbook at home? Here’s how you can make Dropbox into a quasi virtual print server.
Syncing files between your own computers or sharing them halfway around the world is simple and quick with Dropbox. The only problem is, these files are digital. Even today, sometimes we all need printouts of our documents on paper. Most of us are not near a printer all the time, and often today we’re using documents on mobile devices that can’t even print normally.
Dropbox, amazingly, can be a solution to this. Thanks to a free VBS script from our friend Amit over at Labnol.org, you can set your computer to automatically print any file you place in a certain folder in Dropbox. This way, you can save a file to this folder from your smartphone, and get the printout within seconds from your desktop. Let’s see how this works.
Setup Automatic Printing From Dropbox
If you don’t already have Dropbox installed on your computer, download it from the link below and set it up. Then, download and unzip the ePrint.vbs script.
Double-click the eprint.vbs script to run it. This will automatically create a new PrintQueue folder in your Dropbox.
Now, when you want to print something using your default printer and default print settings, simply copy and paste the file into the PrintQueue folder. Note that if you simply drag and drop a file to the folder, it will move the file by default; simply hold the Ctrl key at the same time, though, and it’ll copy the file instead.
That’s it! Your file will automatically open in the default program and print. Once your file’s printed, it’ll be moved from PrintQueue to the log subfolder. This way, if you ever accidently move a file into the folder, you’ll still be able to retrieve it.
This PrintQueue folder will show up on any computer or mobile device you sync with Dropbox, but will only print from the computer running the vbs script. So, you’ll want this script to always run on your primary computer. Simply drag the eprint.vbs file to your Startup folder, and then it’ll always be ready to print your files whenever your computer is running.
Printing Directly From a Program
Now, no matter what computer you’re on, it’ll be easy to print from your primary computer. There’s just one thing to remember: Never save your main files in the PrintQueue folder. Always save your files first to the folder you want to keep them in. Then feel free to press Save as and push another copy to your print folder, and it’ll automatically print, no matter where you are.
Printing From Your Mobile Device
Once you have printing setup on your main computer, it’s easy to print files from any mobile device, too. There are a number of apps for all the popular mobile platforms that integrated with Dropbox, so check out the link below to find apps for your device. Now just write or paste any text you need to print, save it to that folder, and you’ll have your paper copy ready in seconds. There are also many apps that can directly access your Dropbox, so you can copy existing files to your PrintQueue folder as well.
Alternately, you can email files to your Dropbox, and then later move them to the print folder. This is not a perfect solution, but if your app doesn’t integrate with Dropbox, it may be the only way you can get it there. Browse to Habilis (link below), and click Connect to Dropbox to setup the email service.
Login to your Dropbox, then click Allow.
Seconds later, you should see a notification from Dropbox that Habilis has been linked to your account.
Now, go back to Habilis’s site, and you’ll get a unique email address for Habilis. Anything files you email to this address will be added to a /From Habilis folder in your Dropbox, and then you can move it to the print folder later from another app, your browser, or a full computer.
We never cease to be amazed at how useful Dropbox can be. From syncing portable apps between computers to sharing files with others easily to staying on schedule with synced calendars, the ways you can make use of Dropbox are only limited by your imagination. It’s actually cut down on the amount of pages we print out, but if you still need your files on dead trees, this is a great way to do it from anywhere, anytime.
Download Dropbox ePrint [via Labnol.org.]
Download Dropbox for Your Mobile Device
Find Dropbox-powered apps for your PC, mobile device, and more


Sunday, October 17, 2010
How to Synchronize Dropbox and Ubuntu One Online Backup Services by Jun Auza
 How to Synchronize Dropbox and Ubuntu One Online Backup Services: Dropbox and Ubuntu One are two of my favorite online backup services. They both provide safe, reliable, and easy-to-use cloud storage solutions. Their features may vary but they are all important to me, so I have installed and used Dropbox and Ubuntu One together on my Ubuntu desktop.I have Linux, Windows, and Mac computers at home and I find Dropbox essential for quickly synchronizing files across different operating systems. Meanwhile, Ubuntu One is integrated with some of the applications I've installed on Ubuntu such as Evolution and Tomboy notes so I can't live without it too.I find it inconvenient to maintain two online backup services on my Linux box that I decided to link and combine Dropbox and Ubuntu One so that they are synchronized. This means that whenever I made some changes or created some files on my Ubuntu One folder, it will automatically sync with my Dropbox folder, and vice versa. How did I do it? It's really easy.If you have not installed Dropbox yet, I suggest you read this: How to install and use Dropbox in Ubuntu LinuxAfter installation, open the Dropbox preferences and change the default folder location or path and point it to your Ubuntu One folder.
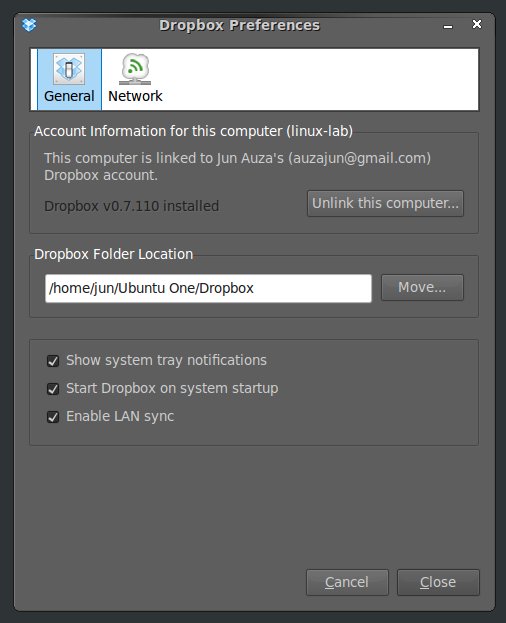
 Next up, right-click on your Ubuntu One folder and click on the "Make Link" option. Move the "Link to Ubuntu One" folder and place it inside the Dropbox folder.
Your original Ubuntu One folder will now be synchronized with Dropbox, which also means you can now access your Ubuntu One folder from your other OS with a Dropbox desktop client installed.That was a really simple trick, isn't it? But, I do hope some of you would also find it useful.
Tuesday, October 5, 2010
What Do I Do When Dropbox Goes Down? [Ask Lifehacker]
What Do I Do When Dropbox Goes Down?
Dear Lifehacker,
My favorite file-syncing tool, Dropbox, suffered a big outage this morning, leaving me high and dry for file syncing and file sharing. What do I do when Dropbox goes down?Signed,
Dropbox DependentDear Dependent,
If there's one thing that makes us occasionally second guess our love for the cloud, it's when something we depend on goes down. This morning, Dropbox went down; at the moment, web access has been restored, but it's still a little shaky.The Good News
The beautiful thing about a service like Dropbox is that, if you're using it primarily to sync files between your own computers, you're not really going to have any serious problems if Dropbox goes down for a few minutes or even an entire day. Since you've got offline copies of your Dropbox files synced to every computer you've installed Dropbox to, it'd be sort of like if Gmail's webapp and IMAP went down, but you were using a desktop client accessing an email database archived on the hard drive every computer you have. That's a pretty sweet situation.
Still, if a Dropbox outage really cramps your style, you've got options.
What Do I Do...
...to Get Syncing Again?
If you're extremely eager (read: desperate) to start syncing files Dropbox-style and Dropbox is still down, you could try out an alternative Dropbox-like file-syncing tool along the lines of SugarSync, Windows Live Mesh, or Syncplicity (the last is Windows only).
You'd probably really only need to do this if you only need to sync a set of files (rather than re-syncing your entire Dropbox directory, which could take a while) and it's extremely important to your workflow that you get multi-machine syncing back up and running right away.
Note: Dropbox does support syncing over your local area network, meaning that if you've got two or more computers on the same LAN, you may be able to continue using Dropbox to sync locally without any hiccups. One Lifehacker editor said this was working for him while Dropbox was down; for others of us, it wasn't. Your mileage may vary, but if it is working, let us know in the comments.
...to Share Files?
Apart from personal file syncing, Dropbox's other major use case has always been sharing files between friends and co-workers—something it excels at. You drop a file in your Dropbox folder, grab a public link to share, and paste it for a friend to download.
When Dropbox is down, you're probably looking for other options. To that end, consider checking out these four solid file-sharing alternatives to Dropbox. Personally, I've always liked Drop.io's quick, ad-spam-free file-sharing tools, but the others listed will do the trick nicely, too.
...for Everything Else I Count On It For?
It's a pretty safe bet that, for the most part, Dropbox won't stay down for more than a few hours. In the lifespan of the service, I'm not sure I can remember another major downtime. If you use Dropbox for other purposes beyond file syncing and sharing—say, for example, to host a static web site, start your BitTorrent downloads, sync passwords, or one of these other clever use-cases, and you really need those things to work all the time, you may want to consider a backup solution.
For your hosting needs, you might consider finding a great, inexpensive personal web host; for remote BitTorrent downloading, you could start using uTorrent's remote web interface; and for password syncing, we're huge fans of putting LastPass in charge.
Cloud doom and gloom aside (sure we rely on the cloud and it sometimes lets us down, but cloud services are getting more and more reliable every year), for most people, the easiest solution is "just be patient." As I was writing this up, the Dropbox status page turned from "down" to "running normally", so things don't look like they got too dire.
Love,
LifehackerSend an email to Adam Pash, the author of this post, at tips+adam@lifehacker.com.
Your version of Internet Explorer is not supported. Please upgrade to the most recent version in order to view comments.Loading comments ...
In order to view comments on lifehacker.com you need to enable JavaScript.
If you are using Firefox and NoScript addon, please mark lifehacker.com as trusted.
 ');
'); 

Friday, October 1, 2010
How to Trigger Torrent Downloads from Anywhere with Dropbox
Say you want to download a torrent on your home computer, but you’re away from home. Sure, you could just take a laptop and download it on that, but that’s hardly ideal most of the time. So how do you accomplish this?
What we’ll do is use Dropbox sync to easily get the torrent files from the laptop to the desktop PC at home, and then use the auto-watching feature of Transmission or uTorrent to check for new torrent files in our Dropbox folder.
Setting Up Prerequisites
If you’re running OS X or Linux and you don’t already have Transmission and Dropbox installed, you’ll need to do so, though Transmission is installed by default on many distributions of Linux. If you’re running Windows you’ll want to install Dropbox and use a client like uTorrent, which supports folder watching for new torrents.
Note: Dropbox is freely available for all platforms, and the basic free version gives you 2GB of storage, more than enough for some torrent files.
Now that you’ve got Dropbox and a torrent client installed, you’ll need to create a folder in your Dropbox that will hold the torrent files you want to download. You can name this anything, but I’d suggest just calling it “Torrents”.
Setup in OS X
To set the watch folder in the OS X version of Transmission, go to its preferences and click on the “Transfers” tab. Check the box next to “Auto add” and choose your Dropbox Torrents folder from the dropdown menu:
You’ll also want to uncheck the box that says “Display a windows when opening a torrent file”. This will prevent a window popping up that requires intervention to close, something we don’t want if we’re away from our computer:
You should also change the default download location to something other than your Torrents folder, as you probably don’t want to download files directly to your Dropbox:
That’s it for setup on the Mac. Read on for setup in Linux.
Setup in Linux
To set up the watch folder on the Linux version of Transmission, go to Edit -> Preferences and click the checkbox next to “Automatically add torrents from” and choose your Torrents folder from the dropdown menu.
You’ll also want to uncheck “Show options dialog” and set the “Save to location” dropdown to something other than your Torrent folder:
Setup in Windows
If you’re using Windows, you’re probably using uTorrent for downloading torrents, so you’ll want to head into the preferences panel, find the Directories option on the left-hand pane, and then check the box for “Automatically load .torrents from:”. Once you’ve done so, then click the file browse icon and choose the Torrents folder from your Dropbox.
You will need to also choose locations for new downloads and completed downloads, or else uTorrent will prompt you.
You will also need to head into the UI Settings section of the preferences and uncheck the option for “Show a window that displays the files inside the torrent”.
If you’re using another client, you will probably find a similar option in the preferences pane.
Starting Torrents From Anywhere
All you have to do to start a torrent on your configured machine is to put it in your Torrents folder on Dropbox, either by dragging it to the folder on another computer, or by uploading it to the web interface (which is useful if you don’t have Dropbox installed on your other machine).
You could also download a torrent to your Android or BlackBerry device and then use the Dropbox application to add it. Dropbox is in the Android Marketplace, and instructions for installing the BlackBerry app are available here.
Once you’re done, you should be able to simply add files to Dropbox and the downloads will be started automatically, as you can see in the screenshot above.


