We’ve received a lot of questions about mapping a drive from XP to Windows 7 to access data easily. Today we look at how to map a drive in Windows 7, and how to map to an XP drive from Windows 7.
With the new Homegroup feature in Windows 7, it makes sharing data between computers a lot easier. But you might need to map a network drive so you can go directly into a folder to access its contents. Mapping a network drive may sound like “IT talk”, but the process is fairly easy.
Map Network Drive in Windows 7
Note: All of the computers used in this article are part of the same workgroup on a home network.
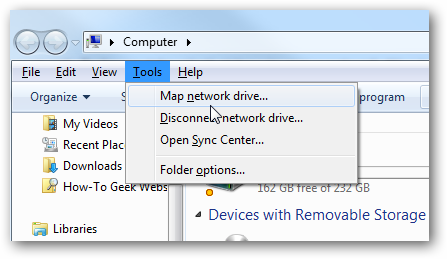
In this first example we’re mapping to another Windows 7 drive on the network. Open Computer and from the toolbar click on Map Network Drive.

Alternately in Computer you can hit “Alt+T” to pull up the toolbar and click on Tools \ Map Network Drive.

Now give it an available drive letter, type in the path or browse to the folder you want to map to. Check the box next to Reconnect at logon if you want it available after a reboot, and click Finish.

If both machines aren’t part of the same Homegroup, you may be prompted to enter in a username and password. Make sure and check the box next to Remember my credentials if you don’t want to log in every time to access it.

The drive will map and the contents of the folder will open up.

When you look in Computer, you’ll see the mapped drive under network location.

This process works if you want to connect to a server drive as well. In this example we map to a Home Server drive.
![sshot-2010-03-18-[14-18-17] sshot-2010-03-18-[14-18-17]](http://www.howtogeek.com/wp-content/uploads/2010/03/sshot20100318141817.png)
Map an XP Drive to Windows 7
There might be times when you need to map a drive on an XP machine on your network. There are extra steps you’ll need to take to make it work however.
Here we take a look at the problem you’ll encounter when trying to map to an XP machine if things aren’t set up correctly. If you try to browse to your XP machine you’ll see a message that you don’t have permission.
![sshot-2010-03-18-[04-06-22] sshot-2010-03-18-[04-06-22]](http://www.howtogeek.com/wp-content/uploads/2010/03/sshot20100318040622.png)
Or if you try to enter in the path directly, you’ll be prompted for a username and password, and the annoyance is, no matter what credentials you put in, you can’t connect.
![sshot-2010-03-18-[04-07-29] sshot-2010-03-18-[04-07-29]](http://www.howtogeek.com/wp-content/uploads/2010/03/sshot20100318040729.png)
In this example we’re mapping from a Windows 7 x64 Ultimate machine to an XP Media Center Edition Laptop on a wireless connection where each machine as a different password.
To solve the problem we need to set up the Windows 7 local account as a user on the XP machine and make it part of the Administrators group to access the full drive. Right-click My Computer and select Manage.

Under Computer Management expand Local Users and Groups and click on the Users folder. Right-click an empty area and click New User.

Add in the user credentials, uncheck User must change password at next logon, then check Password never expires then click Create.

Close out of the New User Screen and you’ll see the user you created in the list. After the user is added, you may need to reboot XP before proceeding to the next step.

At this point you should be able to access the shared folders on the XP machine but not the entire drive. Here we’re browsing to the XP Media Center Edition machine.

Now we can enter in the user name and password we just created.

Now we can browse to and map specific shared folders on the XP machine.
![sshot-2010-03-18-[16-46-22] sshot-2010-03-18-[16-46-22]](http://www.howtogeek.com/wp-content/uploads/2010/03/sshot20100318164622.png)
However, when we try to map to the full drive, we get the annoyance of not being able to log in…
![sshot-2010-03-18-[17-09-14] sshot-2010-03-18-[17-09-14]](http://www.howtogeek.com/wp-content/uploads/2010/03/sshot20100318170914.png)
To access the full drive we need to make the user part of the Administrators group. So go back into Computer Management \ Local Users and Groups \ Groups then double click on Administrators.

Click the Add button in Administrators Properties window.

Enter in the new user you created and click OK. An easy way to do this is to enter the name of the user you created then click Check Names and the path will be entered in for you.

Now you see the user as a member of the Administrators group…click Ok.

Now we can map to the entire drive. Enter in the drive path where in this example it’s “\\XPMCE\C$” –Don’t forget the “$” sign after the local drive letter.
![sshot-2010-03-18-[14-26-52] sshot-2010-03-18-[14-26-52]](http://www.howtogeek.com/wp-content/uploads/2010/03/sshot20100318142652.png)
Then login…
![sshot-2010-03-18-[14-54-17] sshot-2010-03-18-[14-54-17]](http://www.howtogeek.com/wp-content/uploads/2010/03/sshot20100318145417.png)
Again the contents of the drive will open up for you to access.
![sshot-2010-03-18-[15-12-52] sshot-2010-03-18-[15-12-52]](http://www.howtogeek.com/wp-content/uploads/2010/03/sshot20100318151252.png)
Here you can see we have two drives mapped. One to another Windows 7 machine on the network, and the other to the XP computer.
![sshot-2010-03-18-[17-31-16] sshot-2010-03-18-[17-31-16]](http://www.howtogeek.com/wp-content/uploads/2010/03/sshot20100318173116.png)
If you ever want to disconnect a drive, just right-click on it and then Disconnect.

There are several scenarios where you might want to map a drive in Windows 7 to access specific data. It takes a little bit of work but you can map to an XP drive from Windows 7 as well. This comes in handy where you have a network with different versions of Windows running on it.

| Similar Articles | Productive Geek Tips |
| Latest Software Reviews | Tinyhacker Random Tips |


No comments:
Post a Comment